Home
HTML is markup language, used for describing web documents
HTML documents are described by tags with the structure:
<tag>content</tag>
tags are not case sensitive, however it is recommended that they are lower case.
the combination of a tag and its content is referred to as an HTML element.
Tags usually, but not always require a closing tag i.e </tag>
Attributes provide additional information about HTML elements and are specified in the opening tag as name/value pairs i.e name = “some value”, remember to always include quotes around your attribute values.
ex. <tag name = “value”>content</tag>
To create your own HTML document, first open TextEdit on Mac or Notepad on Windows, you will use these plain text editors to write the code for the website.
this is how you create a heading:
<h1> My First Heading </h1>
by changing the number after h, i.e h1 from 1 to 6, you can adjust the default font size. h1 is the most important heading you want to denote in your webpage, while h6 is the least important title.
However the heading should not be used to make the text larger or bold, as CSS is used for that. Tags describe what king of content, ex, title, paragraph etc, is between them, not necessarily the style of that content.
The <p> element describes a paragraph. By default, any amount of whitespace/spaces between words in a paragraph translates to one space. Likewise, line breaks (pressing enter) translate into one space.
<p>My first paragraph.</p>
To insert a line break, we can use the <br> tag.
e.x <p>My first<br>paragraph.</p> note that the <br> tags don’t need a closing tag, because it wouldn’t make sense to have content between them.
<br> tags can be placed outside paragraphs as well.
to have a link appear in your webpage, you would us the <a> tag, and specify the link’s address in the href attribute.
e.x: <a href=“url”>My First Link</a>
Bookmarks allow readers to jump to specific parts of the webpage. First you need to add the id attribute to the location you want to be able to jump to. **Id attributes are unique, **no two elements on the webpage should share the same id. Next, we add a link anywhere on the webpage and link to our element (the heading) by specifying #the_id_we_want to go to as the url in the href attribute of the link.
e.x: <a href=“#there”>Go to My Heading</a>
<h1 id=“there”>My Heading</h1>
Images are described by the <img> tag, and the source file of the image is specified in the src attribute.
<img>tags also don’t need a closing tag because it would’t make sense to have content between them as the tag is enough to describe the image.
e.x: <img src=“url”>
The
- element describes an unordered list, where each item has a bullet point next to it by default.
The
- element describes a list item, and is the same for unordered and ordered lists.
e.x:
<ul>
	<li>Item 1</li>
	<li>Item 2</li>
	<li>Item 3</li>
</ul>
<ol>
	<li>Item 1</li>
	<li>Item 2</li>
	<li>Item 3</li>
</ol>
The type of “numbering” can be specified by the type attribute type=“A” and type=“a” mean capital and lowercase letters. type=“I” and type=“i” mean capital and lowercase roman numerals.
We need containers in HTML otherwise content could only flow from top to bottom. The
<div>tag describes a basic kind of container. The other containers do the same thing as thetag but mean something different. So, it is good practice to use them whenever applicable. The<article>tag specifies independent, self-contained content. The<aside>tag specifies content related to surrounding content, like a sidebar. The<header>tag should contain navigation links or heading elements for a webpage, or a section or article. The<main>tag specifies the main content of a webpage, and should only exist once in an HTML document. The<section>tag specifies a section of a webpage that contains content with a similar theme. e.x:<div>HTML elements.</div>Other containers: `<article> <aside> <header> <main> <section>`Now we have a basic ability to describe content in an HTML document, but we how do we make it look pretty? This is were CSS comes in.
CSS is a language for styling HTML elements and can be integrated with HTML in 3 ways, which will be described later. CSS Syntax: The structure of a statement in CSS involves selecting an HTML element(s), followed be a list of properties separated by semicolons that describe the visual style. e.x: element { property: value; property: value } The CSS selector is what we use to select HTML elements for styling by CSS, as is the element part of the structure described above.
To select every element in the webpage set the element element to * To select every
element in the webpage set the element to p Setting the element to #myid will select the element with id=“myid”. Setting element to .myclass will select every element with class=“myclass” Setting element to h1.myclass will select every
We can select any elements in 4 different states: a:link - selects all unvisited links a:hover - selects links when the user mouses over a:active - selects links when they are clicked a:visited - selects all the visited links
Properties are what we us to describe styles with CSS. They are the part of the structure inside the curly brackets, i.e.
html{ property:value; property:value }When it comes to specifying styles that have to do with sizing or positioning, we need some units to represent distances on any screen.
In CSS px is a unit, an absolute length(approximately 1/96th of an inch), which is not necessarily exactly 1 pixel on your scree. However it is adjusted so that it is constant no matter what resolution screen you are viewing it on, and it can use decimals.
Font size can also be inherited from the body of the html, which is a standard 16px in most browsers. If an element inherits this font-size, then 1em will equal 16px. em is relative to the font size of the element
e.x:
element { height: 1.5em }- will make the element 50% larger than the font size of the element.element { font-size: 1.5em} - the font size of the element will be 50% larger than the font-size inherited by the element.element1 {font-size: 1.5em }- element1 inherits its font size from html. Since the html default font size is 16px, this translates to 1.5em x 16px = 24px.element2 { font-size: 0.5em }element2 inherits its font-size from element1, since element 1 has a font size of 24px, element2 will have a font size of 0.5em x 24px = 12px.It is a common thing to do, especially when it comes to responsive design, such as making a website “mobile friendly,” and accessibility. If em is used throughout the website, then every element is related through front size. If we want to then scale everything or a portion of our website, we need only to change the font size of one element to make that change. If px is used, then they do not share this relationship, so we must change every element individually to scale the website.
the percent symbol represents a percentage of the space allotted to elements in a given container. e.x:
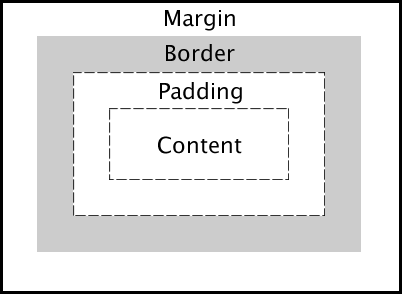
element1 { height: 1em }element2 { height: 80% }here element2 is nested inside element1, so it will have a height of 80% x 16px = 12.8px There are more than the 3 units described here, in html, and it’s worth exploring them online.inner box = Content —>padding ->Border -> Margin The content is where are of our text and images go. The padding is a transparent area around the content. The border surrounds the padding and content. The margin is another transparent area, this time around the border, padding, and content. To clarify, the % unit refers to a percentage of the space allotted to content box. e.x: Content -> Padding -> Margin -> Element background-color: white; -> padding: 1em; -> border: 0.1em solid blue; ->margin: 1em; -> element _there are many different combinations of colors and border sizes that can be used. As well, the content itself can be another element, that is a box within a box. _
We can specify the height and width of elements e.x:
height: length;width: length;We can specify the margin and padding of elements in a few ways. Depending on how many separate length values we list, the browser will give each of the four sides of an element a margin or padding. Padding is specified the same way as margin, except we type padding instead of margin.e.x:
margin: allFourSides; margin: 10px; margin: top&bottom right&left; margin: 10px 12px; margin: top right&left bottom; margin: 10px 12px 15px margin: top right bottom left; margin: 5px 10px 12px 8pxWe can specify the border of elements with a short-hand, or as separate properties.However,Border-radius must be specified separately. short-hand e.x:
border: border-width border-style border-color;separately e.x:border-width: length;border-style: style;border-color: color;border radius e.x:
border-radius: length;We can specify the font of text in an element with a short-hand, or as separate properties. Font weight, if given by a number goes from 100 to 900, in increments of 100 (E.g. 200, 400, 700, not 230 or 352 etc..). Font family can contain a list of fonts, in a fallback system: if the browser can't find the font it tries the next in the list.
short-hand e.x:
font: font-style font-variant font-weight font-size/line-height font-family;separate e.x:font-style: normal|italic|oblique;font-varient: normal|small-caps;font-weight: normal|bold|100-900; note: 400 is normal and 700 is boldfont-size: length;line-height: length;font-family: list-of-fonts;We can also specify the color, alignment of text, and text-decoration of text in an element. e.x:
color: color;text-align: left|right|center|justify;text-decoration: none|underline|overline|line-through;e.x: background-color: color;
display: inline|block|inline-block;- inline elements - have fixed heights and widths, and can be placed next to each other.
- block elements - have default heigh and width which can be changed, and cannot be placed next to each other.
- inline-block - elements have default height and width which can be changed, and can be placed next to each other.
If the height or width of an element is less than what would be required to hold all of the content within it, the extra content, called overflow, can be handled in a few ways.
- overflow: visible|hidden|scroll|auto;
- visible: overflow is not clipped
- hidden: overflow is clipped
- scroll/auto: overflow is clipped but the user can scroll to see the rest of the content.
CSS can be integrated with HTML in a few ways, one is inline CSS. In inline CSS, we list the properties in the style attribute of the element we want to style. We don't have to select an element or use curly braces, but we still separate properties by semicolons. e.x:
<tag style=“property:value; property:value”>My styled content</tag>In internal CSS, we place the CSS in the head element in a special
<style>tag.e.x:
html <!DOCTYPE html> <html> <head> <style> element { property: value; property: value } </style> </head> . . . </html>The last way that we can integral CSS with html is external CSS. In external CSS, we place the CSS in a separate document, and link the webpage to this document. This is the predominant form of CSS we will use as it keeps the html code much cleaner and more readable. e.x: ``` html
</style> . . .In style.css: element { property: value; property: value }```<! DOCTYPE html> //file header that tells the browser this is and HTML 5 document
//It's a great idea to close your tags as soon as you type them! The entire webpage is described between these. add the attribute lang = "en-US" //Information about the document goes in here ex. <title></title> this tag specifies the webpage's title and is required (our first example of a nested element, title is the child of head, every child element has only one parent element, but a parent element can have multiple child elements) the visible content will go here Finished Product: <title> My First Webpage </title>Writing the HTML for our resume
- Set up the document
- <title> My Resume </title>
- - this will be our sidebar later on
- - this is where all our information/work history etc. will go
- Create a new folder beside resume.html called image (the exact name isn’t important) and put the walter.jpg in there.
- In the aside:
a.
 b.
c.
b.
c. 3828 Piermont Dr
d.
//indentation not required Albuquerque, New Mexico 87112(505) 117-8987
e.<a href=“mailto: hiesenberg@example.com”>heisenberg@example.com
- this is a special link that will open your default mail client where you can email the address after the mailto part of the link f.My Website
g. - sub-heading h.From mild-mannered school teacher and family man to ruthless criminal mastermind.
- In this section:
a.
We haven’t seen this yet, it’s just a horizontal rule: a line drawn across the page b. c. d.
e.1976 - 1980
f. Unordered list with “Major in Chemistry” and “Graduation with distinction” repeat this for the other information. Adding the CSS
- element describes an ordered list, where items are numbered by default.
The