-
Notifications
You must be signed in to change notification settings - Fork 5
Expand file tree
/
Copy pathindex.Rmd
More file actions
580 lines (392 loc) · 38.3 KB
/
index.Rmd
File metadata and controls
580 lines (392 loc) · 38.3 KB
1
2
3
4
5
6
7
8
9
10
11
12
13
14
15
16
17
18
19
20
21
22
23
24
25
26
27
28
29
30
31
32
33
34
35
36
37
38
39
40
41
42
43
44
45
46
47
48
49
50
51
52
53
54
55
56
57
58
59
60
61
62
63
64
65
66
67
68
69
70
71
72
73
74
75
76
77
78
79
80
81
82
83
84
85
86
87
88
89
90
91
92
93
94
95
96
97
98
99
100
101
102
103
104
105
106
107
108
109
110
111
112
113
114
115
116
117
118
119
120
121
122
123
124
125
126
127
128
129
130
131
132
133
134
135
136
137
138
139
140
141
142
143
144
145
146
147
148
149
150
151
152
153
154
155
156
157
158
159
160
161
162
163
164
165
166
167
168
169
170
171
172
173
174
175
176
177
178
179
180
181
182
183
184
185
186
187
188
189
190
191
192
193
194
195
196
197
198
199
200
201
202
203
204
205
206
207
208
209
210
211
212
213
214
215
216
217
218
219
220
221
222
223
224
225
226
227
228
229
230
231
232
233
234
235
236
237
238
239
240
241
242
243
244
245
246
247
248
249
250
251
252
253
254
255
256
257
258
259
260
261
262
263
264
265
266
267
268
269
270
271
272
273
274
275
276
277
278
279
280
281
282
283
284
285
286
287
288
289
290
291
292
293
294
295
296
297
298
299
300
301
302
303
304
305
306
307
308
309
310
311
312
313
314
315
316
317
318
319
320
321
322
323
324
325
326
327
328
329
330
331
332
333
334
335
336
337
338
339
340
341
342
343
344
345
346
347
348
349
350
351
352
353
354
355
356
357
358
359
360
361
362
363
364
365
366
367
368
369
370
371
372
373
374
375
376
377
378
379
380
381
382
383
384
385
386
387
388
389
390
391
392
393
394
395
396
397
398
399
400
401
402
403
404
405
406
407
408
409
410
411
412
413
414
415
416
417
418
419
420
421
422
423
424
425
426
427
428
429
430
431
432
433
434
435
436
437
438
439
440
441
442
443
444
445
446
447
448
449
450
451
452
453
454
455
456
457
458
459
460
461
462
463
464
465
466
467
468
469
470
471
472
473
474
475
476
477
478
479
480
481
482
483
484
485
486
487
488
489
490
491
492
493
494
495
496
497
498
499
500
501
502
503
504
505
506
507
508
509
510
511
512
513
514
515
516
517
518
519
520
521
522
523
524
525
526
527
528
529
530
531
532
533
534
535
536
537
538
539
540
541
542
543
544
545
546
547
548
549
550
551
552
553
554
555
556
557
558
559
560
561
562
563
564
565
566
567
568
569
570
571
572
573
574
575
576
577
578
579
580
---
pagetitle: "Linux terminal & Bash"
author: "Jan Verbesselt and Dainius Masiliunas"
date: "`r format(Sys.time(), '%Y-%m-%d')`"
output:
rmdformats::html_clean:
highlight: zenburn
---
```{css, echo=FALSE}
@import url("https://netdna.bootstrapcdn.com/bootswatch/3.0.0/simplex/bootstrap.min.css");
.main-container {max-width: none;}
div.figcaption {display: none;}
pre {color: inherit; background-color: inherit;}
code[class^="sourceCode"]::before {
content: attr(class);
display: block;
text-align: right;
font-size: 70%;
}
code[class^="sourceCode r"]::before { content: "R Source";}
code[class^="sourceCode python"]::before { content: "Python Source"; }
code[class^="sourceCode bash"]::before { content: "Bash Source"; }
```
<font size="6">[WUR Geoscripting](https://geoscripting-wur.github.io/)</font> <img src="https://www.wur.nl/upload/854757ab-168f-46d7-b415-f8b501eebaa5_WUR_RGB_standard_2021-site.svg" alt="WUR logo" style="height: 35px; margin:inherit;"/>
# Linux terminal & Bash
## Learning objectives
- Knowing how to use the *terminal*
- Running R and Python from the terminal
- Learn the basics of *Bash* scripting and know how to create a shell script
# Using the terminal and *Bash*
There are two ways to interact with your operating system: a graphical user interface (GUI), where you point and click, and a command-line interface (CLI), where you type commands to make something happen. GUIs are simpler to use, but CLIs are more powerful and faster for some tasks, once you get used to them.
```{block, type="alert alert-success"}
> **Question 1**: What are the advantages of using CLI? Can you think of some examples?
```
Most Linux distributions come with a *terminal*, which is a program you use to run CLI programs. You might know the *Command Prompt* program on Windows: that is a type of *terminal*. On Linux, there is a variety of terminal applications to choose from. You can start one on your virtual machine by clicking on *Show Apps* → *Terminal*. This will look like:

A *terminal* is just a gateway to the world of CLIs, but through it you interact with a particular *shell* (or *command interpreter*) which speaks a programming language. The default shell on Linux is *Bash*, and programs written in the *Bash* language are called *Bash scripts*. Much like the *R* console, you can input commands to *Bash* line by line through the *terminal*.
*Bash* shell scripting, like also *R* or *Python*, allows multiple commands to be combined, facilitating automation. A shell script (shell program) is a text file that contains commands that are interpreted by the shell (see below, we will learn how to write a shell script). Each command can be linked in a script to combine several commands by providing the output of one as input to the other. Shell scripts can also contain the control structures common to the majority of programming languages (i.e. variables, logic constructs, looping constructs, functions and comments). The main distinction between shell programs and those written in C, C++, Java (to name but a few) is that shell programs are not compiled for execution, but are readily interpreted by the shell.
```{block, type="alert alert-success"}
> **Question 2**: What is a shell script? What is Bash? And what is terminal?
```
*Bash* is not only the default shell on Linux, but also macOS, and there are versions of *Bash* that run on Windows too. It is included with Git for Windows, and in Windows 10 *Bash* is even included by default with the [*Windows Subsystem for Linux*](https://msdn.microsoft.com/en-us/commandline/wsl/about). However, without the wealth of CLI programs that Linux distributions come with, *Bash* functionality is fairly limited.
But enough theory: let's try using the terminal in practice!
## Using the terminal
Now, fire up your terminal. You get a line, stating your user name and the machine’s host name. This is called the shell prompt. It means it’s ready for you to enter a command. Let’s try something random. Type in anything, and press enter.
Most likely the system doesn't have the command you typed in! Random doesn't work: you need to remember (or look up) commands to use them!
Now, press the up arrow, and you’ll see the previous command reappear. What’s this sorcery? The up arrow key on your keyboard is for accessing the command history. The terminal saves up to 500 commands you entered, so to not type them over and over, you can look for them with the up/down arrow. The left and right arrows are for moving the cursor within a specific line, so you can edit the text in between. The terminals were designed to work with a keyboard, so you can't use your mouse to move the cursor, but you can use the Home key to go to the beginning of the line, and the End key to go to the end. Now there’s another thing – **Ctrl+V** for pasting text **doesn’t work**. You can set it up as a shortcut somewhere, but it’s usually something else, e.g. Ctrl+Shift+Insert. But you can always paste if you right-click on the terminal, and it usually tells you what is the keyboard shortcut to do so, so that you don't need the mouse every time.
Now, for us not to get the ‘command not found’ slap to the face, let’s try something simple. Type `date`.
```{bash, eval=FALSE}
date
```
There you go. Why bother looking at your built-in calendar in the clock, when you can fire up your terminal and type `date`, and see what day it is! Just kidding, it’s a simple command, the more useful/difficult ones are coming up next. The related command to `date` is `cal` – it will display the current month’s calendar.
You may also try `free`, and it will display the amount of free memory.
```{bash, eval=FALSE}
free
```
Or `df` (standing for "disk free"), to list free space on your drives.
If you’re already in the type-only mood, you can enter the command `exit` to get out of the terminal emulator instead of pressing the "x" button.
## Navigation through the file system
Here’s a diagram of what a linux root filesystem looks like:

For example, as stated in the above picture, your user directory (where you usually store your movies, music, documents etc.) is located in the */home* directory. */home* directory is located under */*. Then you have the */etc* directory, where most of the files for configuration are located.
The next command to look into is `pwd`. `pwd`, or ‘print working directory’, is a very useful command if you think you are lost navigating through the directories. At any given moment, type `pwd`, and voila! What appears is a complete pathway you took to arrive to this directory.
Imagine yourselves walking from room to room inside a massive apartment, losing your way. `pwd` is like the breadcrumb trail leading you to your starting point, so you don’t lose your way inside the directory maze! (Bonus: [How to use pwd command in Linux](http://www.cyberciti.biz/faq/pwd-linux-unix-command-examples/))
Now you know in which directory you’re situated thanks to your usage of the `pwd` command. Now you want to take the next step and move to another directory. Let’s say you have a directory inside your home directory you want to relocate your top secret terminal operation to. For this, you use the `cd` command. `cd`, or ‘change directory’, will change the location of your working directory. How do you use it? Simple, type `cd` and the path to your directory. Let’s say, for example, you want to enter what is on WUR Windows computers known as your "M: drive" (or just a directory called `M`) in your home directory. You type `cd /home/username/M`.
There are also some shortcuts available. If you type only `cd`, without the path following it, your terminal will change your working directory (whatever it may be) to your `/home` directory. Likewise, if you type `cd ~user_name`, it will lead you to the home directory of the specific user you stated.
Try it out yourself. Navigate to a different directory using `cd`, and when there, type `pwd` to see if everything worked as it is supposed to. Once you're done, you should have something like this displayed in your terminal:

In the example above (`cd Downloads/`), we used what is called a *relative path*. It is a path relative to your current working directory (`pwd` states that it is */home/osboxes*), whereas typing in `cd /home/osboxes/Downloads` would be using an *absolute path*. An absolute path is like giving geographic coordinates (e.g. 10°N 5°E), whereas a relative path is like giving directions: "10 km to the north and 5 km to the east from where you are standing". On Linux, absolute paths always start with */*, and relative paths never start with */*.
In terms of scripting, you should *almost never use absolute paths*! This is because absolute paths are for the most part unportable: just because you have a directory called */home/osboxes/Downloads* does not mean that someone else who runs the code, or indeed you yourself on another computer, would have a directory with that name. Especially if it includes your username! Relative paths are more useful: your script could create a directory called *Downloads* and not have to worry about which user it belongs to. It will be created relative to the working directory, as shown by `pwd`.
Lastly, there are two special "directories" that are present in every directory: `.` and `..`. `.` refers to the directory itself, i.e. *Downloads/.* as well as *Downloads/./.* and *./Downloads* is all the same as *Downloads*. `..` refers to the parent directory: *Downloads/..* is the same as your working directory, as it instructs Bash to look into the directory *Downloads* and then go back out of it again.
## Command options
Now we know how to move from one directory to another, but how do you know what directories there are for you to move between? `ls` is a command used to list files and directories in a given directory. It can be used in various ways. These various ways come with using a form of adding an *option* to our command. To make things clearer; you can simply type `ls`. But, you can also add an option, which will *modify* your command. It can come in useful when you are looking for something specific.
That’s what an option is. And formally we can write it down like this:
```
command -option argument
```
*Command* is, well, a command we write in (like `pwd`, `ls` or anything else we have learned by now).
We already stated above the purpose of an *option*. But note that it should be written exactly as it’s in the form; with a *dash* in front of it. So, if the option is `l`, you should put `-l` after the command.
An *argument* is an object upon which the command operates (in this case, it will be directories, as we are learning how to navigate through them).
So, let’s try out `ls`, and use it on the `/etc` directory in the root of the filesystem. This time, without any options.
```{bash, eval=FALSE}
ls /etc
```
```{bash, eval=FALSE}
ls /etc | head
```
There you go, a whole bunch of files. It also sorts them by colours. The blue ones are directories, the white ones are regular files, the green ones are executable files. There are more colours, as they represent different file types.
Next, you can use the same command, but with an option `-l` added. Option `-l` will list the same files and directories, but in a *long format*. In case you need more information:
```{bash, eval=FALSE}
ls -l /etc
```
```{bash, eval=FALSE}
ls -l /etc | head
```
So, using the long format, you see much more information, and some crazy looking signs like `-rw-r–r–` at the beginning of all lines. Actually, here’s a scheme, representing what all of the given information actually means:
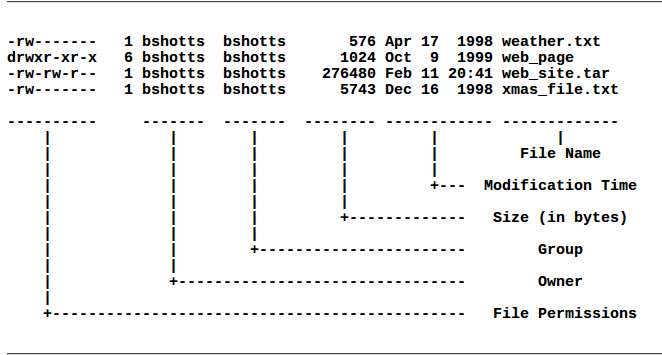
File Name is the name of the file. Modification time is the last time the file has been modified. Size is the size of the file in bytes. Group is the name of the group that has file permissions along with the owner, and Owner is the user who owns the file.
The most important one is *File Permissions*. That’s the gibberish at the beginning of every line in long format. The first character is the file type. If it’s a `d`, it means the file is actually a directory. If it’s `-`, it means it’s an ordinary file. The next three characters represent the read, write and execution rights of the file’s owner. The next three are the same rights of the group that also has access to the file, and the last three characters represent rights of everyone else trying to use the file.
So for example, if we have a file which in long format displays: `-rw-r--r--`, it means it’s an ordinary file (the first `-`), the owner of the file can read and write the file, but he can’t execute it, as it’s not an executable file (the `rw-` characters after the initial `-`), and the user group and everyone else can only read the file (you can see `r--` sequence repeating twice). If the user group had `rwx` instead of `r--`, it would mean they could read, write and execute the file.
Next option for `ls` is `ls -la ..` - this will list all of the files, as in a usual command, hidden files are not shown. It will list all files in the parent of the working directory in long format.
```{block, type="alert alert-success"}
> **Question 3**: What is the difference between `ls -l`, `ls -lh` and `ls -lh \-\-si`? *Hint: try running each command in the terminal and observe the differences in the output. You can also run `man ls` to inspect the meaning of different options.*
```
## Getting information about files
`less` is a command which will display a text file and let you scroll through it. For example, you’re looking for text file `os-release` in `/etc`. You have succesfully found it there with `ls /etc`, and now you want to read it. You just use `less /etc/os-release`.
How do you control `less`? Easy, with your keyboard!
`less` will display only one page of your text at a time. You can move line by line with the arrow keys. To go forward an entire page, you can press **Page Up**. To go *back* one page, you can use **Page Down**. **>** will take you to the end of the text file, while **<** will take you to the beginning of the text. `/characters` will search for `characters` inside the text (for example, if you write `/ubuntu`, it will search for occurrences of `ubuntu` inside your text and mark them). **n** will go to the *next* occurrence of the search term, and **h** will display all your options (h as in help!). You quit less with the letter **q**.
The name `less` is a pun on the word `more`, which is a much more basic tool for displaying a text file and scrolling, because it only allows scrolling down; therefore, *`less` is more than `more`*.
The `file` command will show what kind of file is that you’re looking for, be it ASCII text, a jpg image, a bash script etc. As we performed our exercise with `/etc/os-release`, let’s use it here also.
```{bash, eval=FALSE}
file /etc/os-release
```
There you go, now you know what `os-release` is. Incidentally, it may be either an ASCII text file or a link to one! It depends on your Linux distribution (version). If it's a link, try to run the command on the linked file. Now try it out with something else, and see the output.
Next, we have the commands `type` and `which`. Like `file`, they give information on the type, but they operate on commands instead of files. `which` tells you where you can find the executable that is run if you type in a command. Let's try it on the command `file`:
```{bash, eval=FALSE}
which file
```
Now we know that when we run `file`, Bash executes the program `/usr/bin/file`. How about `cd`?
```{bash, eval=FALSE}
which cd
```
What?! It seems that there is no such executable! This is because it is so common, it's built into Bash itself. `type` is a bit more clever than `which` and tells you whether a command is an executable file, or a command built into Bash itself. Let's see what it says about `cd`:
```{bash, eval=FALSE}
type cd
```
In some cases, you might have both available. Let's take a look at the command `time` that is used to measure how long a command runs for:
```{bash, eval=FALSE}
type time
```
It is also built into Bash itself. But there is another command called `time` that is an actual executable:
```{bash, eval=FALSE}
which time
```
Because the shell prefers builtins compared to executables, when you run `time` you will run the builtin version, rather than the executable version. But you can reach the executable version (which is more feature-rich!) by calling it with its absolute path:
```{bash, eval=FALSE}
/usr/bin/time -V
```
`type` and `which` will come very much in handy once we get to Python, as we will have several Python versions installed. It will help determine which version we have active.
## File manipulation
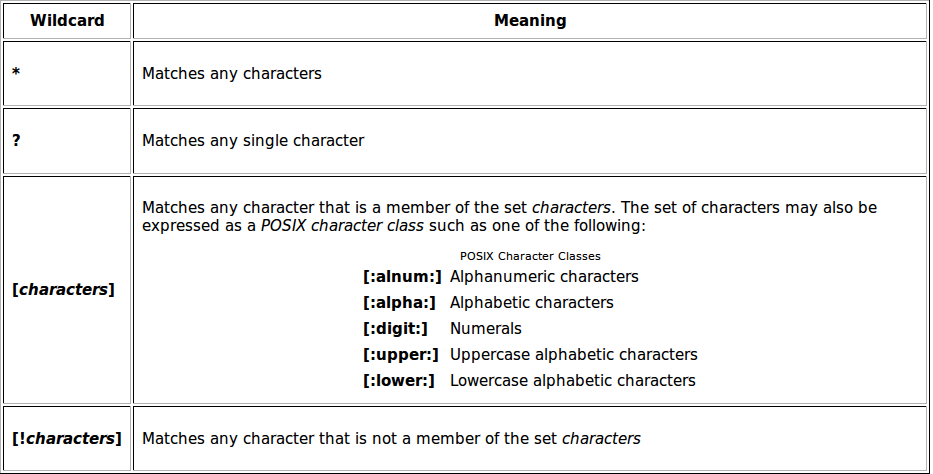
Copying, pasting files, creating directories etc. is probably easier using graphical tools, but, if you’d like to perform more complicated tasks, like copying only *.html* files from one directory to another, and only copying files that don’t exist in the destination directory, CLI just might come in handy. So, before we start with the commands themselves, let’s take a quick stop at *wildcards*. They are a set of special characters that help you pick out a set of files based on some simple rules (which characters appear in a file name, how many characters, upper/lower case characters etc.). Here’s the table:
And here are a few examples:
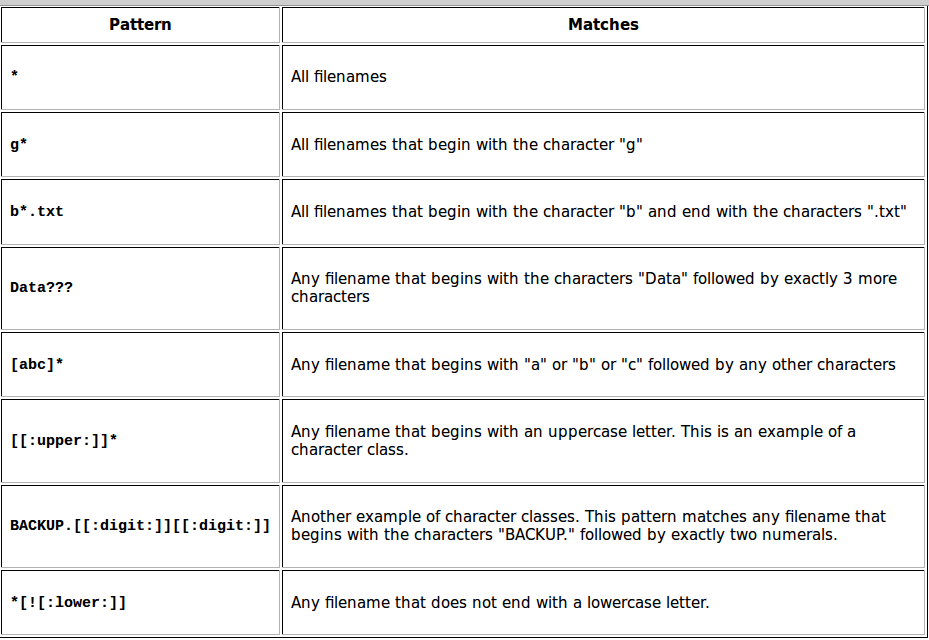
If you use a command with an argument containing a filename, you can use wildcards with no problem. Bash will go ahead and *expand* the wildcard into a set of all matching filenames, and the command will actually receive a set of files and not the wildcard string.
`cp` is used to copy files or directories. You can use it pretty easily: navigate to the directory you’d like to copy the files from and to, and simply do `cp file1 file2` - to copy single files, or `cp file1 file2 ... directory` - to copy files from your current working directory to the directory specified.
We can use `mv` to rename a file or directory, or to *move* a file or directory. We can use it this way: `mv filename1 filename2` - if we want to rename *filename1* to *filename2*, or `mv file directory` - if we want to move *file* to *directory*.
The `rm` command removes/deletes files and directories. Usage is pretty straightforward: `rm file` or `rm -r directory`. But, do be careful when using `rm`, as there is no undelete option (the file is erased and doesn't go to the bin), so be extra careful not to inflict unwanted damage to your system!
`mkdir` is used for creating directories. Now, create a directory called `Bash` (i.e. a directory that will contain our *Bash* scripts):
```{r, eval=FALSE, engine='bash'}
mkdir Bash
```
It should now look like this:

Now, try typing the following commands in the terminal, run them, and observe what they do:
- make a directory and remove it (e.g. `mkdir namedirectory` and `rmdir namedirectory` or `rm -r namedirectory`).
- create an *R* script via `touch` (e.g. `touch filename.R`; you can also use `rstudio` or `rkward` to start R to create *R* script).
- then copy it (e.g. `cp filename.R newname.R`).
- then remove it (e.g. `rm newname.R`).
- use `ls` commands and its options to check content in current directory.
```{block, type="alert alert-info"}
**Tip**: Bash has a feature called Tab-completion. If you start writing a command or filename, pressing the `Tab` key a couple of times will give a list of suggestions for auto-completion. This is super-handy so that you never need to write filenames etc. In addition, you can recall the last commands you entered by using the up arrow key. Lastly, you can always open multiple terminals, even in tabs, by using *File* → *Open Tab*, or the little sheltered plus mark on the top left corner of terminal.
```
```{block, type="alert alert-success"}
> **Question 4**: What command line would you need if you want to move all R files in a directory into its parent directory?
```
To recap so far, here's a list of most common commands:
- `pwd`: show your current working directory
- `cd`: change directory
- `cd ..`: move up one directory
- `mkdir`: create directory
- `touch`: basic command used to change file timestamps or create an empty file if it doesn't exist
- `rm` or `rm -R`: delete files or directories
- `sudo`: running programs as root (administrator/super-user), which may ask for your user password
- `ls`: listing files in a directory
- `cp`: copy files e.g. for backing up things or just copying. We will use these command in the scripts below.
## Find help with documentation and manuals
Mostly every command has documentation that comes with it. So you’re somewhere doing your CLI thing, no access to the internet so you can’t bug people on the forums or IRC, and you need to find out how to exactly use a command. You can do it two ways. The first is the command `help`. The `help` command works with shell builtins, and not executable files. So you can pick a shell builtin, like `cd` or `time`, and simply type `help cd` or `help time`. You’ll get a helpful page printed out in your terminal, so go ahead and read what they have to offer. Here's another example:
```{bash, eval=FALSE}
help help
```
The help page shows in what ways you can use the command, what options you can use (it’s in square brackets, which means they are optional! Also, if there’s a vertical separator inside the square brackets, it means the options mentioned are mutually exclusive. Don’t use them together!)
`help` works only for the shell builtins. But most executables provide an option `--help`. As far as usage goes, it’s similar to `help`, but you have to type `--help` after the command you want to inspect. For example:
```{bash, eval=FALSE}
cd --help
```
However, `--help` is just a convention, which programs are not obliged to follow. Sometimes the option is called `-h`, and sometimes it is not present at all.
To get more information about how to use a command, most executables come with a formal documentation page. Distributions often mandate the inclusion of a manual page for every package, so the manual page is the most useful source of information. You can inspect the manual page using the `man` command. You just enter `man program`, and see what it prints out. Pick any program on your computer, and try it out. For example, let’s try `man which`. You get a file opened, split into categories. It gives you information what the program is, what it does, how you can use it etc., but it doesn’t offer examples, as it’s not a tutorial.
Manual pages are text files displayed in a pager program that allows easy scrolling. The default pager is `less`, which you have already used in the third exercise. You can also look at its manual page using `man less`. Also try `man intro`: the "Introduction to user commands", a well-written, fairly brief introduction to the Linux command line.
```{block, type="alert alert-info"}
**Optional**: You can also read the [Ubuntu documentation on CLI](https://help.ubuntu.com/community/UsingTheTerminal) to learn more, and let us know if you have questions about some commands.
```
## Package installation and management
One of the greatest advantages of Linux distributions over other OSs is the package manager. Even if you never used Linux before, you are probably already using a package manager on your mobile device: The App Store, Google Play Store and Windows Store are all package managers, modelled after the Linux ones. A package manager is a central system for downloading, installing and removing software.
Each major Linux distribution has its own package manager, which is aware of all packages maintained by the distribution. These packages are tested and are known to work with that particular distribution version, so the package manager is the first place to look for installing additional software. The package manager is typically a command-line program, although some distributions also have GUI interfaces for it.
Ubuntu uses *Aptitude* as the package manager. Here is a short list of the most useful package manager commands on Ubuntu:
- `apt search packagename`: Search for a package called "packagename".
- `apt list package*`: List all packages starting with "package".
- `sudo apt install packagename`: Install or update a package. This changes system files and therefore requires administrator privileges (`sudo`).
- `sudo apt remove packagename`: Uninstall a package.
- See `man apt` for more.
For instance, if you run `apt list chrom*`, one of the results will be `chromium-browser`. It's [Chromium](https://en.wikipedia.org/wiki/Chromium_(web_browser)), the open-source version of Google Chrome. You can install it by running `sudo apt install chromium-browser`. Similarly, the Ubuntu package repository contains a lot (but not all) of R packages (they are prefixed with `r-cran-`) and Python packages (prefixed with `python3-`; the ones prefixed with `python-` are for Python 2 which is deprecated). If there is a package available in the distribution repository, almost always it is better to use that instead of using a package manager built into the language (`install.packages` in R and `easyinstall`/`pip`/`conda` in Python).
Now, let's install a package from the terminal, which we will later use to create our Bash script:
```{bash, eval=FALSE}
sudo apt install gedit
```
You will be prompted to enter your password — this is the same as your login password for the virtual machine. The installation may take a moment but should complete quickly!
The aforementioned commands are specific to the Debian family of Linux distribution (of whom Ubuntu is a member). In other distributions, package manager syntax is different, but the result is the same. For instance, in openSUSE the equivalent commands would be `zypper search`, `sudo zypper install` and `sudo zypper remove`.
Whenever a package is not included in the distribution repository, one option is to look for additional software sources. Ubuntu allows users to maintain their own packages through a system called Personal Package Archives (PPA). However, these packages are not tested and are not guaranteed to work, or could even cause problems in the system, so you have to be careful. Other distributions also have their own third-party repository systems: openSUSE uses Open Build Service, Fedora uses Copr etc.
If a package doesn't exist in third party repositories either, there is often the possibility to download the source code of a package and compile it. It is common for cross-platform software vendors to provide installers for Windows and source code for Linux. However, compiling from source yourself should only be done as the very last resort; in fact, it is often easier and safer to create a package yourself than to try to build it from source!
## Starting R or Python from the terminal
Starting and stopping R from the terminal (this is the same as the R console you know from *RStudio*/*RKWard*):
```{r, engine='bash', eval=FALSE}
R # just type R and then q() to exit
q()
```

Starting and stopping *Python* from the terminal:
```{bash, eval=FALSE}
python3
exit()
```
## Scripting in the terminal
So far, you've been running commands directly in the terminal, one at a time. But what if you want to automate a sequence of commands or reuse them later? That’s where Bash scripts come in — they allow you to store a series of commands in a file and run them all at once, just like a simple program.
### Hello, world Bash script
*Bash* is primarily a scripting language, so it would be a crime not to talk about scripting. Let's dive straight in with a *Bash* script. More precisely the infamous "Hello World" script. You can create a bash script by opening your favorite text editor to edit your script and then saving it (typically the `.sh` file extension is used for your reference, but is not required. In our example, we will be using the `.sh` extension).
So let's get started. First, create a simple text file and call it `HelloWorld.sh`, save this in the `Bash` directory you just created, and add the following text. While `gedit`, the package we just installed, is used as the main example for editing files, you can also use `rstudio` or `rkward` as an alternative text editor if you prefer. In fact, `rstudio` makes it rather convenient to edit Bash scripts, exactly the same way as R scripts, including the ability to run commands line by line. It is also worth noting that there are even command-line text editors, like `nano`, which are useful for editing files that require administrative privileges.
Paste this piece of code into an editor you choose and save it:

```{r, eval=FALSE, engine='bash'}
#!/bin/bash
echo "Hello, World"
```
The first line of the script just defines which interpreter to use (and where it is located). That's it, simple as that!
```{block, type="alert alert-danger"}
**Note**: There is no leading whitespace before `#!/bin/bash`, and you cannot add any comments before it. This *shebang* should be the very first thing in the file.
```
To find out where your `bash` interpreter is located type the following in the terminal (this works also on a Mac terminal!):
```{bash, eval=FALSE}
type bash
```
Second, to run a bash script, you have two options.
The first is have to set the correct file permissions.
We do this with `chmod` (change mode) command in terminal as follows, this needs to be done only once per file:
```{bash, eval=FALSE}
ls -l # Check what's the current permissions
chmod u+x HelloWorld.sh # Gives your user execute permissions
```
```{block, type="alert alert-info"}
**Optional**: [More info about `chmod`](https://help.ubuntu.com/community/FilePermissions) for your future reference. Note: today is just an introduction to let you know what is possible so that you can find your way easier in the future.
```
In this case, we can then proceed to run the script directly in the terminal:
```{bash, eval=FALSE}
./HelloWorld.sh
```
Alternatively, we can specify which interpreter to use specifically, and then pass the file name to the interpreter.
This option does not require changing file permissions:
```{bash, eval=FALSE}
bash HelloWorld.sh
```
Below is a summary of what we have done in the terminal:
```{bash, eval=FALSE}
echo "Go to the Bash directory"
cd Bash
echo "Check that the file is there using the ls command:"
ls -l
echo "Then change the permissions:"
chmod u+x HelloWorld.sh
echo "We can now run our first Bash script:"
./HelloWorld.sh
```
Hopefully you should have seen it print `Hello, World` onto your screen. If so well done! That is your first *Bash* script (see below for a screenshot):

```{block, type="alert alert-success"}
> **Question 5**: In the first option above, why do we add `./` in front of the Bash script name? What happens if you don't? Why?
```
```{block, type="alert alert-info"}
**Note**: optinally, we can also run Bash code from R using the `system()` function that can invoke an OS command:
```
```{r, eval=FALSE, message=TRUE}
# R code
setwd("Bash/") # Set the working directory in R
print(system("./HelloWorld.sh", intern = TRUE)) # Execute this command in Bash
```
```{block, type="alert alert-info"}
**Note**: And vice versa, we can run an R script from the terminal using Bash:
```
```{bash, eval=FALSE}
Rscript some-r-script-file.R
```
```{block, type="alert alert-info"}
**Note**: In this lesson, to keep things simple, we'll use `gedit` and RStudio as text editors to edit scripts, and run them only from the terminal.
```
### Bash script with a variable
Variables basically store information. You set variables like this (you can type this in the terminal, no space in between!).
```{bash, eval=FALSE}
var="FOO"
```
`var` can be anything you want as long as it doesn't begin with a number. "FOO" can be anything you want. There **cannot be any space** in between the `=` sign! To access the information from the variable you need to put a '$' in front of it like this (again, this can be done after following the previous line in script or in terminal):
```{bash, eval=FALSE}
echo $var
```
Now create the following e.g. `variables.sh` script in the *Bash* directory and apply the `chmod u+x variables.sh` command on this script using the terminal.
```{r, eval=FALSE, engine='bash'}
#!/bin/bash
echo "Now with the read function"
clear
echo "Please enter your name"
read name
echo "Please enter your age"
read age
echo "So you're a $age year old, called $name"
```
You can run the script once it is *executable*:
```{r, engine='bash', eval=FALSE}
./variables.sh
```
```{block, type="alert alert-success"}
> **Question 6**: Try it out yourself, and try to do a calculation of e.g. a + b as input variables. Hint: [Shell-tips](https://www.shell-tips.com/2010/06/14/performing-math-calculation-in-bash/)
```
```{block, type="alert alert-info"}
**Optional**: If you want to learn more about *Bash* scripting: [https://help.ubuntu.com/community/Beginners/BashScripting](https://help.ubuntu.com/community/Beginners/BashScripting)
```
For the next section, let's download a file from the [Intro to raster](https://geoscripting-wur.github.io/IntroToRaster) tutorial. **Manually** download the `gewata.zip` file from Github ([link](https://github.com/GeoScripting-WUR/IntroToRaster/releases/download/tahiti/gewata.zip)). Create a `data` directory and unzip it there, you should have a [.TIF file](https://en.wikipedia.org/wiki/TIFF). Then navigate to this directory in your terminal.
## Using the GDAL library from the terminal
GDAL is a very powerful and fast processing library written in C/C++ for raster and vector geospatial data formats. Now via the terminal we can access GDAL directly! E.g. we can check out what the current version of GDAL is that is installed on our Linux OS. We will learn more about GDAL in the later tutorials.
Type the following in the `data` directory: (Note: You can write a shell script to do the following commands below but first type in the commands via the terminal to understand what is happening.)
```{bash, eval=FALSE}
echo "the current GDAL version is:"
gdal-config --version
```
One of the easiest and most useful commands in GDAL is `gdalinfo`. When given an image as an argument, it retrieves and prints all relevant information that is known about the file. This is especially useful if the image contains additional tag data, as is the case with `TIF` files.
Using gdalinfo:
```{r, eval = FALSE, engine='bash'}
cd data
ls *.tif
gdalinfo -nomd -norat -noct LE71700552001036SGS00_SR_Gewata_INT1U.tif
```
You should now see some information about the raster file, for example the coordinate system, the cell size, and some statistics about the raster bands.
Now let's calculate the [NDVI](https://gisgeography.com/ndvi-normalized-difference-vegetation-index/) by running the following command line by line in terminal. The calculation is done via GDAL command by using the `gdal_calc.py` script. See [GDAL_calc](http://www.gdal.org/gdal_calc.html) for more information.
```{r, engine='bash', eval=FALSE}
cd data
cp LE71700552001036SGS00_SR_Gewata_INT1U.tif input.tif
echo "* all files in the directory"
ls
echo "* now apply gdal_calc: Command line raster calculator with numpy syntax"
gdal_calc.py -A input.tif --A_band=4 -B input.tif --B_band=3 --outfile=ndvi.tif --calc="(A.astype(float)-B)/(A.astype(float)+B)" --type='Float32'
echo "* remove the input temporary file"
rm input.tif
```
```{block, type="alert alert-success"}
> **Question 7**: Try to write to calculate the NDVI using the lines above in a nice and short shell script.
- Hint 1: use `cd ..` to move to the parent directory
- Hint 2: No spaces in file names are allowed and try to use variables e.g. `fn=$(ls *.tif)`
```
Let's now check if the range of the NDVI values makes sense, and make a nice script from the following code block in a separate file (this will work only if you have one .TIF file in the data directory, as `fn=$(ls *.tif)` will get you all the tif files in the directory):
```{r, engine='bash', results='hide', eval=FALSE}
#!/bin/bash
echo "teamname"
echo "Current date"
echo "Calculate LandSat NDVI"
mkdir -p output
fn=data/*.tif
echo "The input file(s): $fn"
outfn=output/ndvi.tif
echo "The output file: $outfn"
echo "calculate ndvi"
gdal_calc.py -A $fn --A_band=4 -B $fn --B_band=3 --outfile=$outfn --calc="(A.astype(float)-B)/(A.astype(float)+B)" --type='Float32'
echo "look at some histogram statistics"
gdalinfo -hist -stats $outfn
```
```{block, type="alert alert-info"}
More info here on the power of GDAL via the terminal:
[GDAL_website](http://www.gdal.org/) and `gdalinfo`
Handy functions are (See the examples at the bottom):
- [`gdal_translate`](http://www.gdal.org/gdal_translate.html)
- [`gdalwarp`](http://www.gdal.org/gdalwarp.html)
**Optional**:
More info about *Bash* basics from [GNU](https://www.gnu.org/software/bash/manual/bashref.html#Command-Substitution).
```
# More information
- [Ryan's Linux & Bash Tutorial ](https://ryanstutorials.net/linuxtutorial/) goes into more depth but is also very handy to reference, and includes a [cheat sheet](https://ryanstutorials.net/linuxtutorial/cheatsheet.php) with commands.
- [Hands-on introduction to bash basics for beginners](https://news.opensuse.org/2014/06/10/command-line-tuesdays-part-one/)
- [A great bash scripting tutorial](http://linuxconfig.org/bash-scripting-tutorial)
- [Basic terminal usage and installing software](http://www.howtogeek.com/140679/beginner-geek-how-to-start-using-the-linux-terminal/)
- [Beginners guide to nano, the linux command line text editor](https://www.howtogeek.com/42980/the-beginners-guide-to-nano-the-linux-command-line-text-editor/)
- [Learning the shell](http://linuxcommand.org/lc3_learning_the_shell.php)
- [How to use pwd command in Linux](http://www.cyberciti.biz/faq/pwd-linux-unix-command-examples/)
- For macOS users and introduction to use the terminal on macOS:
- [Navigating the terminal a gentle introduction](http://computers.tutsplus.com/tutorials/navigating-the-terminal-a-gentle-introduction--mac-3855)
- [Learn the macOS command line](http://blog.teamtreehouse.com/introduction-to-the-mac-os-x-command-line)
- [Is the terminal in macOS and Linux the same](https://stackoverflow.com/questions/8051145/is-the-terminal-in-mac-and-linux-the-same)