Most new transmitter such as the Taranis series do not require any additional drivers to be installed on the computer to use it with Companion for configuration and model editing. Flashing the remotes via PC (with dfu-util) needs drivers installed but this can be avoided by flashing with the bootloader. The exception is the FrSKY Horus X12S that, unlike the Taranis model, does not have a bootloader that allows flashing without additional drivers. Once flashed using the bootloader menu (described below) the bootloader is also updated and windows drivers will not be required for FrSKY transmitters except the Horus X12S.
You do not need install these drivers unless you are sure you need it.
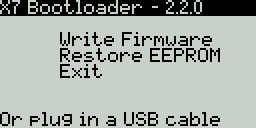
To power up the transmitter in Bootloader mode:
- Power off the transmitter
- Pull the two horizontal trims towards the centre
- Power on the transmitter
- Release the trims
- Check the bootloader version number on the top line of the LCD screen
| Tx | OpenTX Bootloader | Flash method | | --- | ------------------- | ------ | ----------------------- | | X7 | 2.2 | Bootloader, Dfu-util | | X9D | 1.x | Dfu-util | | X9D | 2.x | Bootloader, Dfu-util | | X9D+ | 2.x | Any | Bootloader, Dfu-util | | X9E | 2.x | Any | Bootloader, Dfu-util | | X12S | 2.2 + later | Windows | Dfu-util |
Companion 2.2 for Mac and Windows comes with Dfu-util. Linux distribution usuall have a package for dfu-util. Windows needs drivers installed via Zadiag utility
The first thing to do is to power your radio off and connect it to your computer's USB port.
For flashing a
Horus TX or if you need to recover your Taranis, you will need to install these drivers.
Installing the driver is only required the first time you flash your
radio on a given computer. If already done this step, you can skip
this section.
- Download the Zadig utility for your operating system from its homepage: http://zadig.akeo.ie/
- Run it as Administrator (Right-click and select the relevant entry).
- In the big dropdown, you should find an entry named either "STM32 BOOTLOADER" or "STM Device in DFU mode". Select it, and click the "Install Driver" button.
- If you do not have one of those entries, choose Options -> List All Devices, and it should now appear in the list. Select it, and click the "Replace Driver" button. DO NOT do it for anything else than those 2 possibilities. If you see "FrSky Taranis Bootloader" you have connected your radio with power on instead of power off, and overwriting the driver with Zadig would render the SD card and models/settings inaccessible.


Zadig will install the driver, and should report success. When done you can dismiss the message and close it.

Should none of these options work, you can download the driver here and install it manually (instructions are on the download page).
When the driver is properly installed, you should see this in the device manager:
Dfu-util is avaialble in most distributions. For example in Ubuntu it can be installed by
sudo apt-get install dfu-util
Companion for Mac OS already includes the required ``dfu-util'' tool
and does not require any additional installation of tools or drivers.
The only recommended way to download the OpenTX firmware is using Companion. This process compiles/builds the firmware on the OpenTX servers and downloads a copy to the computer.
To download the firmware follow these steps:
- Radio Profile: Make sure the correct transmitter profile is selected
- Build Options: Make sure the build options selected are the ones you want
- Download Firmware: File -> Download
- Click on Download firmware (The download could take a few minutes)
- Save the firmware .bin file on the computer
- You may be prompted to write the firmware to the transmitter
- If you want to choose yes connect the transmitter to the computer in bootloader mode
- Click on Yes
- Select Check Hardware compatibility to make sure the firmware being written to the transmitter is for that particular hardware.
- Click on Write to TX
- Eject the mounted drives
- Disconnect the USB cable
- Power the transmitter off
Connect the transmitter to the computer in bootloader mode.
There are two options to write the firmware:
- Using The Bootloader Menu
- Using Companion
- Place a copy of the firmware on the sd card in the FIRMWARE folder
- Rename the firmware file so that the filename including the .bin extension is 35 characters or less.
- Eject the two mounted drives
- Disconnect the USB cable
- Choose Write Firmware from the bootloader menu
- Select the firmware to be written
- Press ENT
- Hold ENT down to start writing the firmware
- When the “Writing Complete” message is displayed press EXIT
- Power the transmitter off
- Read/Write -> Write Firmware to Radio
- A Flash Firmware window appears
- Click on Load and select the firmware file downloaded using companion
- Select Check Hardware compatibility to make sure the firmware being written to the transmitter is the correct one
- Click on Write to TX
- Eject the two mounted drives
- Disconnect the USB cable
- Power off the transmitter
Once you have installed the firmware you will also need to install the
sd card content (unless you do not use a sd card).
See the Sdcard for more details.