To ensure that the scripts/applications that you will write in this course works seamlessly, we need to install few applications/libraries. I have detailed ways to do the same for different OS distributions here. The recommended way for your OS is also marked.
- A shell runnning
shcompliant implementation (bash/zsh/fish) Python3.x (preferably the latest)Jupyterfor installing notebooks. IMPORTANT: The instructions for installingJupyterare attached at the end of this guide and is OS-agnostic.
You can use cloud based services to create/modify/access your own Jupyter
notebooks. The most popular one is Google Colaboratory, for which you need to
sign into Google.
Install your favorite Python IDE (Integrated Development Environment) such as
PyCharm or Spyder, to name a few. The list is non-exhaustive and an internet search
should reveal more.
We can load a virtual machine in your environment—it’s essentially an ‘OS’ that runs inside your ‘OS’.
Follow the steps listed here 7. Download both:
shell and python3 already installed
Try any one of the following methods.
- Almost works off the shelf! You have access to the shell from the
Terminalapplication. Python3can be installed directly using theCondadistribution 4. Installation of the Anaconda distribution for Linux systems can be found here.- Enjoy using
Pythonfrom theCondadistribution on theTerminal. - To install packages in the current virtual environment (details skipped for
brevity) do
	  conda update conda
	  conda install -c anaconda numpy scipy matplotlib pandas
- Almost works off the shelf! You have access to the shell from the
Terminalapplication. - Install the
Spyder IDEfrom the Terminal using the following steps. Also gives access to an editing environment which provides useful syntax-highlighting, among other shiny features.# Fetches up-to-date package information from #the Ubuntu aptitude repository sudo apt-get update # Upgrades all packages sudo apt-get upgrade # Install Python3, if not already there sudo apt-get install spyder3
- You can now use the
Spyder IDEto launchPythonprocesses.
- Almost works off the shelf!
- To ensure that all packages are up to date, and that you have the latest
Pythoninstallation run the following commands in yourTerminal(typeterminalin theUbuntudash, and enter the following commands)
# Fetches up-to-date package information from the Ubuntu aptitude repository
sudo apt-get update

# Upgrades all packages
sudo apt-get upgrade

# Install Python3, if not already there
sudo apt-get install python3-pip

# See if pip3 installed successfully and is in your path
which pip3

# Install other libraries using pip
pip3 install numpy scipy matplotlib pandas
- You can now type in
python3in theTerminalapp prompt and will be taken to thepythonenvironment.
- Use an external package manager, the recommended choice being Linuxbrew. It is painful to install, especially if you can’t navigate your way around the terminal. If you are just getting used to the terminal environment, this option is not for you.
- Follow the instructions for building Linuxbrew from their website first.
- After successfully installing Linuxbrew, just type installation
brew install python3- This should also install
pip3, which you can use to installPythonpackages.
- Unfortunately
Windowsenvironment uses a different shell interpreter, which complicates scripting and development. However you can run aLinuxsubsystem perfectly within Windows!- This needs Windows build 16215 or later for painless processing (which you most probably have as Microsoft aggressively updates their products).
- If you want you can check your build here. 1
- Open
PowerShellas Administrator and run:
Enable-WindowsOptionalFeature -Online -FeatureName Microsoft-Windows-Subsystem-Linux- Restart your computer when prompted.
- Once this is done, you can install the
Linuxdistro of your choice from the Windows Store.- Open the Microsoft Store and choose your favorite
Linuxdistribution (sayUbuntu) - From the distro’s page, select “Get”
- Open the Microsoft Store and choose your favorite
- Launch the distro from the start menu, like any other app. You can find it at
<distro_name>(in the case ofUbuntu, this will be calledUbuntu)- The first launch will take some time
- Set the required
Linuxusername and password (this can be different than youWindowsuser name and password) - You are now running a
shcompliant shell. Type in the following to update the repository information.# Fetches up-to-date package information #from the Ubuntu aptitude repository sudo apt-get update # Upgrades all packages sudo apt-get upgrade
- To get a working installation of
Pythonwithin yourLinuxsubsystem, follow the steps listed in Method #3 (Recommended if you want more control) for theLinuxdistros. This will give you everything within your Linux environment. - If you need a
Pythoninstallation in your Windows environment, you can use Anaconda. Installation of the Anaconda distribution for Windows systems can be found here.- You can then use
Pythonfrom theAnaconda promptapplication. - To install packages in the current virtual environment (details skipped for
brevity) do
conda update conda conda install -c anaconda numpy scipy matplotlib pandas - You can then use
- Alternatively you can also download the official Python installer from the source. I didn’t test this option out.
Try any one of the following methods.
- Once again,
Python3can be installed directly using theCondadistribution. Installation of the Anaconda distribution for systems running MacOS can be found here. - Enjoy using
Pythonfrom theCondadistribution on theTerminal. - To install packages in the current virtual environment (details skipped for
brevity) do
	  conda update conda
	  conda install -c anaconda numpy scipy matplotlib pandas
- Alternatively, download the Python installer. I do not recommend this option.
- MacOS sorely misses a package manager for installation of binaries. So you
can install the
Homebrewpackage manager found here. - The installation might seem long drawn (I have listed the time needed below), but will usually proceed without difficulty. You can consult the reference 6 if you face any issues. The steps are given below:
- You need to install
Command Line ToolsofXcode. Type in the following in the terminal to see if you have already installed it
xcode-select -pIf the output is non-null, you can safely skip to the next step. If not, type in the following in your terminal:
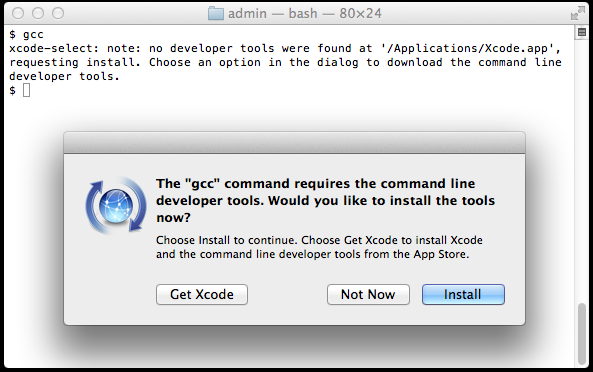
xcode-select --installThis usually pops up a display window like this. The instructions in the
alert box are confusing. You don’t need to “Get Xcode” from the App
Store. Just click “Install” for the Xcode Command Line Tools. If you have
a slow Internet connection, this step may take many minutes. After the
installation repeat the xcode-select -p command and this time you will
see the path of installation of Command Line Tools in your terminal prompt.
- Now we can install
Homebrewby typing in the following commands
ruby -e "$(curl -fsSL https://raw.githubusercontent.com/Homebrew/install/master/install)"Quoting Hitchhiker’s guide to Python,
“The script will explain what changes it will make and prompt you before the installation begins.”
- You should then be able to type in
brew install python3and Python3, along with pip should be installed.
- Note:
Python3is a prerequisite to installJupyter. You can find all the relevant information in Jupyter’s home page 8. - If you have your
Pythoninstallation done viaConda, you should also have jupyter-notebook installed. To verify this typejupyter notebookin your terminal to see the
Jupyterconsole up and running in your browser. - Alternatively, you can also install
Jupyterquickly viapip. Just type#Upgrades pip repository information pip3 install --upgrade pip pip3 install jupyterin your terminal prompt. You can verify successful installation by typing in your terminal:
jupyter notebook
7 https://andreask.cs.illinois.edu/ComputeVirtualMachineImages