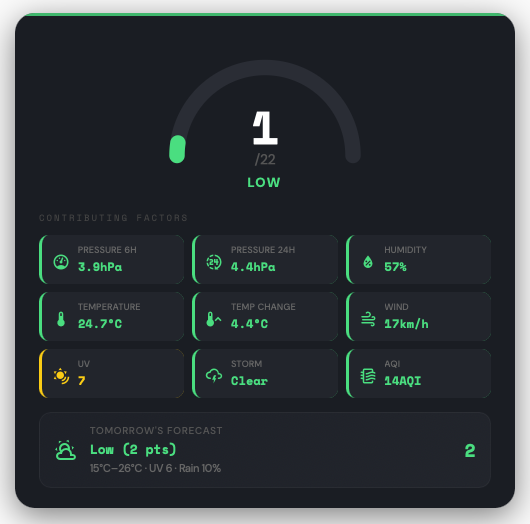
A science-backed environmental migraine risk monitoring card for Home Assistant. Tracks 9 weather and air quality factors known to trigger migraines and displays a composite risk score with a visual gauge.
I'm a chronic migraine sufferer, and over the years I've learned that my migraines don't just appear out of nowhere — they follow the weather. A pressure drop before a storm front, a sudden temperature swing, poor air quality days — these are the invisible triggers that can send me reaching for medication hours later.
Knowing this changed everything for me. If I can see the environmental warning signs before symptoms hit, I can take my preemptive medication early and actually get ahead of an attack instead of chasing it. So I built a sensor system in Home Assistant that watches the weather for me and tells me when conditions are stacking up.
I shared a few screenshots of my dashboard with friends, and then they shared them, and before long people were asking how they could set it up for themselves. So here it is — the same system I rely on every day, packaged up for anyone who wants to take back a little control from their migraines.
I hope it helps you as much as it's helped me.
- 9 Environmental Factors: Barometric pressure drops (6h & 24h), humidity, temperature extremes, rapid temperature changes, wind speed, UV index, thunderstorm proximity, and air quality (AQI/PM2.5/PM10/ozone)
- Composite Risk Score: 0–22 point scale with four risk levels (Low, Moderate, High, Very High)
- Tomorrow's Forecast: Predicts next-day migraine risk from forecast data
- Works with Any Weather Integration: BOM, OpenWeatherMap, Met.no, Weatherbit, or any provider that creates weather entities
- Optional Air Quality: Connects to WAQI, OpenAQ, or any AQI sensor for enhanced scoring
- Configurable Entity Mapping: Point the card and sensors at whatever entities you have — no hardcoded assumptions about your setup
- Dark Theme Design: Purpose-built dark UI with colour-coded risk indicators and a semicircular gauge
- Dual Mode: Works with the included sensor package (recommended) or standalone with the card computing scores internally
- Open HACS in your Home Assistant sidebar
- Click the three-dot menu → Custom repositories
- Paste:
https://github.com/GreenNovaEmma/migraine-risk-card - Set category to Dashboard
- Click Add, then find "Migraine Risk Card" in the Frontend list and install it
- Add the resource in Settings → Dashboards → Resources:
- URL:
/hacsfiles/migraine-risk-card/migraine-risk-card.js - Type: JavaScript Module
- URL:
The sensor package creates the derived sensors (pressure drops, temperature changes, etc.) that most weather integrations don't provide natively.
Before you start: You must already have at least one weather integration configured in Home Assistant. The Migraine Risk Card does not fetch weather data itself — it reads from sensors that your weather integration provides. If you don't have one yet, go to Settings → Devices & Services → Add Integration and search for your local weather provider (e.g. Bureau of Meteorology, OpenWeatherMap, Met.no). See Configuring Data Sources below for details on supported integrations.
-
Make sure packages are enabled in your
configuration.yaml:homeassistant: packages: !include_dir_named packages
-
Download the latest sensor package and save it to your
/config/packages/directory:- Direct link to latest: migraine_sensors.yaml on main branch (right-click → Save As)
- Or grab it from the most recent release: releases page → Assets →
migraine_sensors.yaml
⚠️ Don't reuse an older local copy. If you previously installed the sensor package and have an old version sitting on your machine, please re-download the latest one — earlier versions had a bug that breaks the risk score on new installs (see Upgrading from a pre-v2.0.3 install). -
Restart Home Assistant
-
Configure your data sources — tell the sensor package which of your weather entities to use. You have two options:
Option A: Through the Home Assistant UI (easiest)
- Go to Settings → Devices & Services → Helpers
- You'll see a list of helpers starting with "Migraine Source:" — these are where you tell the system which of your entities to read from
- Click on each one and enter the entity ID of your matching sensor. For example, click on "Migraine Source: Pressure" and type in the entity ID of your pressure sensor (e.g.
sensor.openweathermap_pressure) - If you don't have a sensor for a particular helper, just leave it blank — that factor will be skipped
Option B: Edit the YAML directly
- Open
packages/migraine_sensors.yamlin a text editor - Find the
input_text:section near the top - Set the entity IDs using the HA UI (Settings → Helpers) or via automations/scripts — values persist across restarts
-
Sensors will begin populating within ~10 minutes as the pressure and temperature tracking automations run
The table below shows the sensors the package uses, what each one does, and an example of the kind of value it reads. Only the weather entity and a pressure sensor are required — everything else is optional and improves accuracy.
| Helper Name | What It Does | Example Value | Required? |
|---|---|---|---|
| Migraine Source: Weather Entity | Your main weather integration — provides temperature, humidity, wind as fallbacks | weather.home |
Yes |
| Migraine Source: Pressure | Barometric pressure — the single most important migraine trigger | 1013.2 hPa |
Yes |
| Migraine Source: Temperature | Current temperature (falls back to weather entity if not set) | 24.2°C |
No |
| Migraine Source: Humidity | Current humidity (falls back to weather entity if not set) | 59% |
No |
| Migraine Source: Wind Speed | Current wind speed (falls back to weather entity if not set) | 13 km/h |
No |
| Migraine Source: UV Index | UV index for sun exposure scoring | 7 |
No |
| Migraine Source: AQI | Air Quality Index for pollution scoring | 42 AQI |
No |
| Migraine Source: PM2.5 | Fine particulate matter (refines air quality scoring) | 12.3 µg/m³ |
No |
| Migraine Source: PM10 | Coarse particulate matter (refines air quality scoring) | 28.1 µg/m³ |
No |
| Migraine Source: Ozone | Ozone level (refines air quality scoring) | 65 µg/m³ |
No |
| Migraine Source: Weather Warnings | Weather warning/alert sensor for thunderstorm detection | Severe Thunderstorm Warning |
No |
| Migraine Source: Forecast Text (Today) | Today's forecast text for thunderstorm/wind keyword detection | Partly cloudy. Possible thunderstorm... |
No |
| Migraine Source: Tomorrow Max Temp | Tomorrow's forecast maximum temperature | 32°C |
No |
| Migraine Source: Tomorrow Min Temp | Tomorrow's forecast minimum temperature | 18°C |
No |
| Migraine Source: Tomorrow UV Index | Tomorrow's forecast UV index | 9 |
No |
| Migraine Source: Tomorrow Forecast Text | Tomorrow's forecast text for wind/storm detection | Windy with possible storms... |
No |
| Migraine Source: Tomorrow Rain Chance | Tomorrow's rain probability (humidity proxy for forecast) | 80% |
No |
Option A: Through the UI (easiest)
- Open the dashboard you want to add the card to
- Click the pencil icon (top right) to enter edit mode
- Click + Add Card
- Scroll down to the Custom section, or search for it, and select "Migraine Risk Card"
- The card's configuration panel will open — fill in your entity mappings and click Save
Option B: YAML configuration
If you prefer YAML, click "Show code editor" in the card config panel and paste:
type: custom:migraine-risk-card
entity_risk_score: sensor.migraine_risk_score
entity_risk_level: sensor.migraine_risk_level
entity_forecast: sensor.migraine_risk_forecast_tomorrow
entity_pressure_6h: sensor.migraine_pressure_drop_6h
entity_pressure_24h: sensor.migraine_pressure_drop_24h
entity_humidity: sensor.migraine_factor_humidity
entity_temperature: sensor.migraine_factor_temperature
entity_temperature_change: sensor.migraine_factor_temperature_change
entity_wind_speed: sensor.migraine_factor_wind
entity_uv_index: sensor.migraine_factor_uv_sun
entity_storm: sensor.migraine_factor_thunderstorm_nearby
entity_air_quality: sensor.migraine_factor_air_quality
All factor entities are optional — the card only displays what you configure. If you installed the sensor package with the default settings, the entity names above will work without any changes.
⚠️ Read this if you installed any version before v2.0.3.
Versions before v2.0.3 had a bug where Home Assistant sluggified name: "Migraine Temperature (°C)" into sensor.migraine_temperature_degc (and similarly sensor.migraine_wind_speed_km_h), but the scoring templates referenced sensor.migraine_temperature / sensor.migraine_wind_speed. The result: temperature and wind factors silently returned 0 and your risk score was wrong.
v2.0.3 fixes the YAML so fresh installs get the correct entity IDs. But Home Assistant locks unique_id → entity_id mappings in the entity registry on first registration, so just updating the YAML doesn't rename your existing entities — you need a one-time manual rename.
For each affected entity:
- Settings → Devices & Services → Entities
- Search
migraine_temperature_degc - Click it → click the cog icon (top right)
- Change Entity ID from
sensor.migraine_temperature_degctosensor.migraine_temperature - Click Update
- Repeat for wind: search
migraine_wind_speed_km_h→ rename tosensor.migraine_wind_speed - Reload templates (Developer Tools → YAML → Template Entities) or restart HA
After that, the v2.0.3 YAML works as intended — templates find the right entities, the temperature-baseline automation runs, and the risk score scores correctly.
Not sure if you're affected? Go to Developer Tools → States and search migraine_temperature. If you see sensor.migraine_temperature_degc (with the _degc suffix), you need the fix. If you see sensor.migraine_temperature cleanly, you're fine — either you're on a fresh v2.0.3+ install or you already manually renamed it.
The sensor package uses input_text helpers to store your entity mappings. This makes it easy to change your data sources at any time without editing YAML — just update the helper value in the UI and the sensors will pick up the new source automatically.
You need at least one weather integration installed in Home Assistant. The card doesn't fetch weather data directly — it reads from sensors created by your weather integration. If you haven't set one up yet:
- Go to Settings → Devices & Services → Add Integration
- Search for your preferred weather provider and follow the setup prompts
- Once configured, you'll find new weather entities in Developer Tools → States (search for
weather.orsensor.)
To find the entity IDs for your weather sensors:
- Go to Developer Tools → States in your Home Assistant
- In the filter box, type
weather.to see your weather entities, orsensor.followed by your integration name (e.g.sensor.openweathermap) - Note down the entity IDs you want to use
Here are some common examples for popular integrations:
| Data Source | BOM (Australia) | OpenWeatherMap | Met.no |
|---|---|---|---|
| Weather entity | weather.YOUR_LOCATION |
weather.openweathermap |
weather.home |
| Pressure | sensor.YOUR_STATION_pressure |
sensor.openweathermap_pressure |
(use weather entity) |
| UV Index | sensor.YOUR_LOCATION_uv_max_index_0 |
sensor.openweathermap_uv_index |
(not available) |
| AQI | sensor.YOUR_LOCATION_air_quality_index |
— | — |
Tip: If your weather integration doesn't provide a dedicated pressure or temperature sensor, don't worry. The system will fall back to reading those values from the weather entity's attributes. Just make sure you've set the Weather Entity helper and the fallback will kick in automatically.
The system evaluates 9 environmental factors, each scored on a 0–2 or 0–4 point scale:
| Factor | Max Points | Trigger Thresholds |
|---|---|---|
| Pressure drop (6h) | 4 | ≥4hPa: 1pt, ≥6: 2pts, ≥8: 3pts, ≥10: 4pts |
| Pressure drop (24h) | 3 | ≥6hPa: 1pt, ≥10: 2pts, ≥14: 3pts |
| Humidity | 2 | <30%: 1pt, >80%: 2pts |
| Temperature extreme | 2 | >30°C or <5°C: 2pts |
| Temperature change (6h) | 2 | ≥5°C: 1pt, ≥8°C: 2pts |
| Wind speed | 2 | ≥35km/h: 1pt, ≥50km/h: 2pts |
| UV index | 2 | ≥6: 1pt, ≥8: 2pts |
| Thunderstorm | 2 | Forecast: 1pt, Active warning: 2pts |
| Air quality (AQI) | 3 | AQI 51–100: 1pt, 101–150: 2pts, 151+: 3pts (with PM2.5/PM10/ozone nudge) |
| Total | 22 |
Risk Levels:
- Low (0–3): Minimal environmental triggers
- Moderate (4–7): Some factors present — stay aware
- High (8–11): Multiple triggers active — take preventive action
- Very High (12+): Significant environmental stress — strong migraine risk
Research has shown that several environmental factors can trigger migraines:
- Barometric pressure drops are the most studied environmental trigger. A drop of 5–10 hPa over 6–24 hours is associated with increased migraine frequency (Kimoto et al., 2011; Okuma et al., 2015).
- High humidity (>80%) and extreme temperatures have been linked to migraine onset (Hoffmann et al., 2015).
- Rapid temperature changes can trigger vasodilation/vasoconstriction cycles.
- Thunderstorms bring sudden pressure changes, electromagnetic activity, and increased sferics.
- Poor air quality (high PM2.5, ozone) is associated with increased headache prevalence (Szyszkowicz et al., 2009).
This card aggregates these factors into a single actionable score, so you can take preventive measures before symptoms start.
The card source lives at src/migraine-risk-card.js. The file in dist/ is the built artefact shipped to users — for now it's a straight copy of src/, no bundler involved. To release a change: edit src/, bump CARD_VERSION, copy to dist/, and tag.
If you find this card useful, consider buying me a coffee:

MIT Licence — see LICENCE for details.