Chevy Bolt
 |
 |
|---|---|
 |
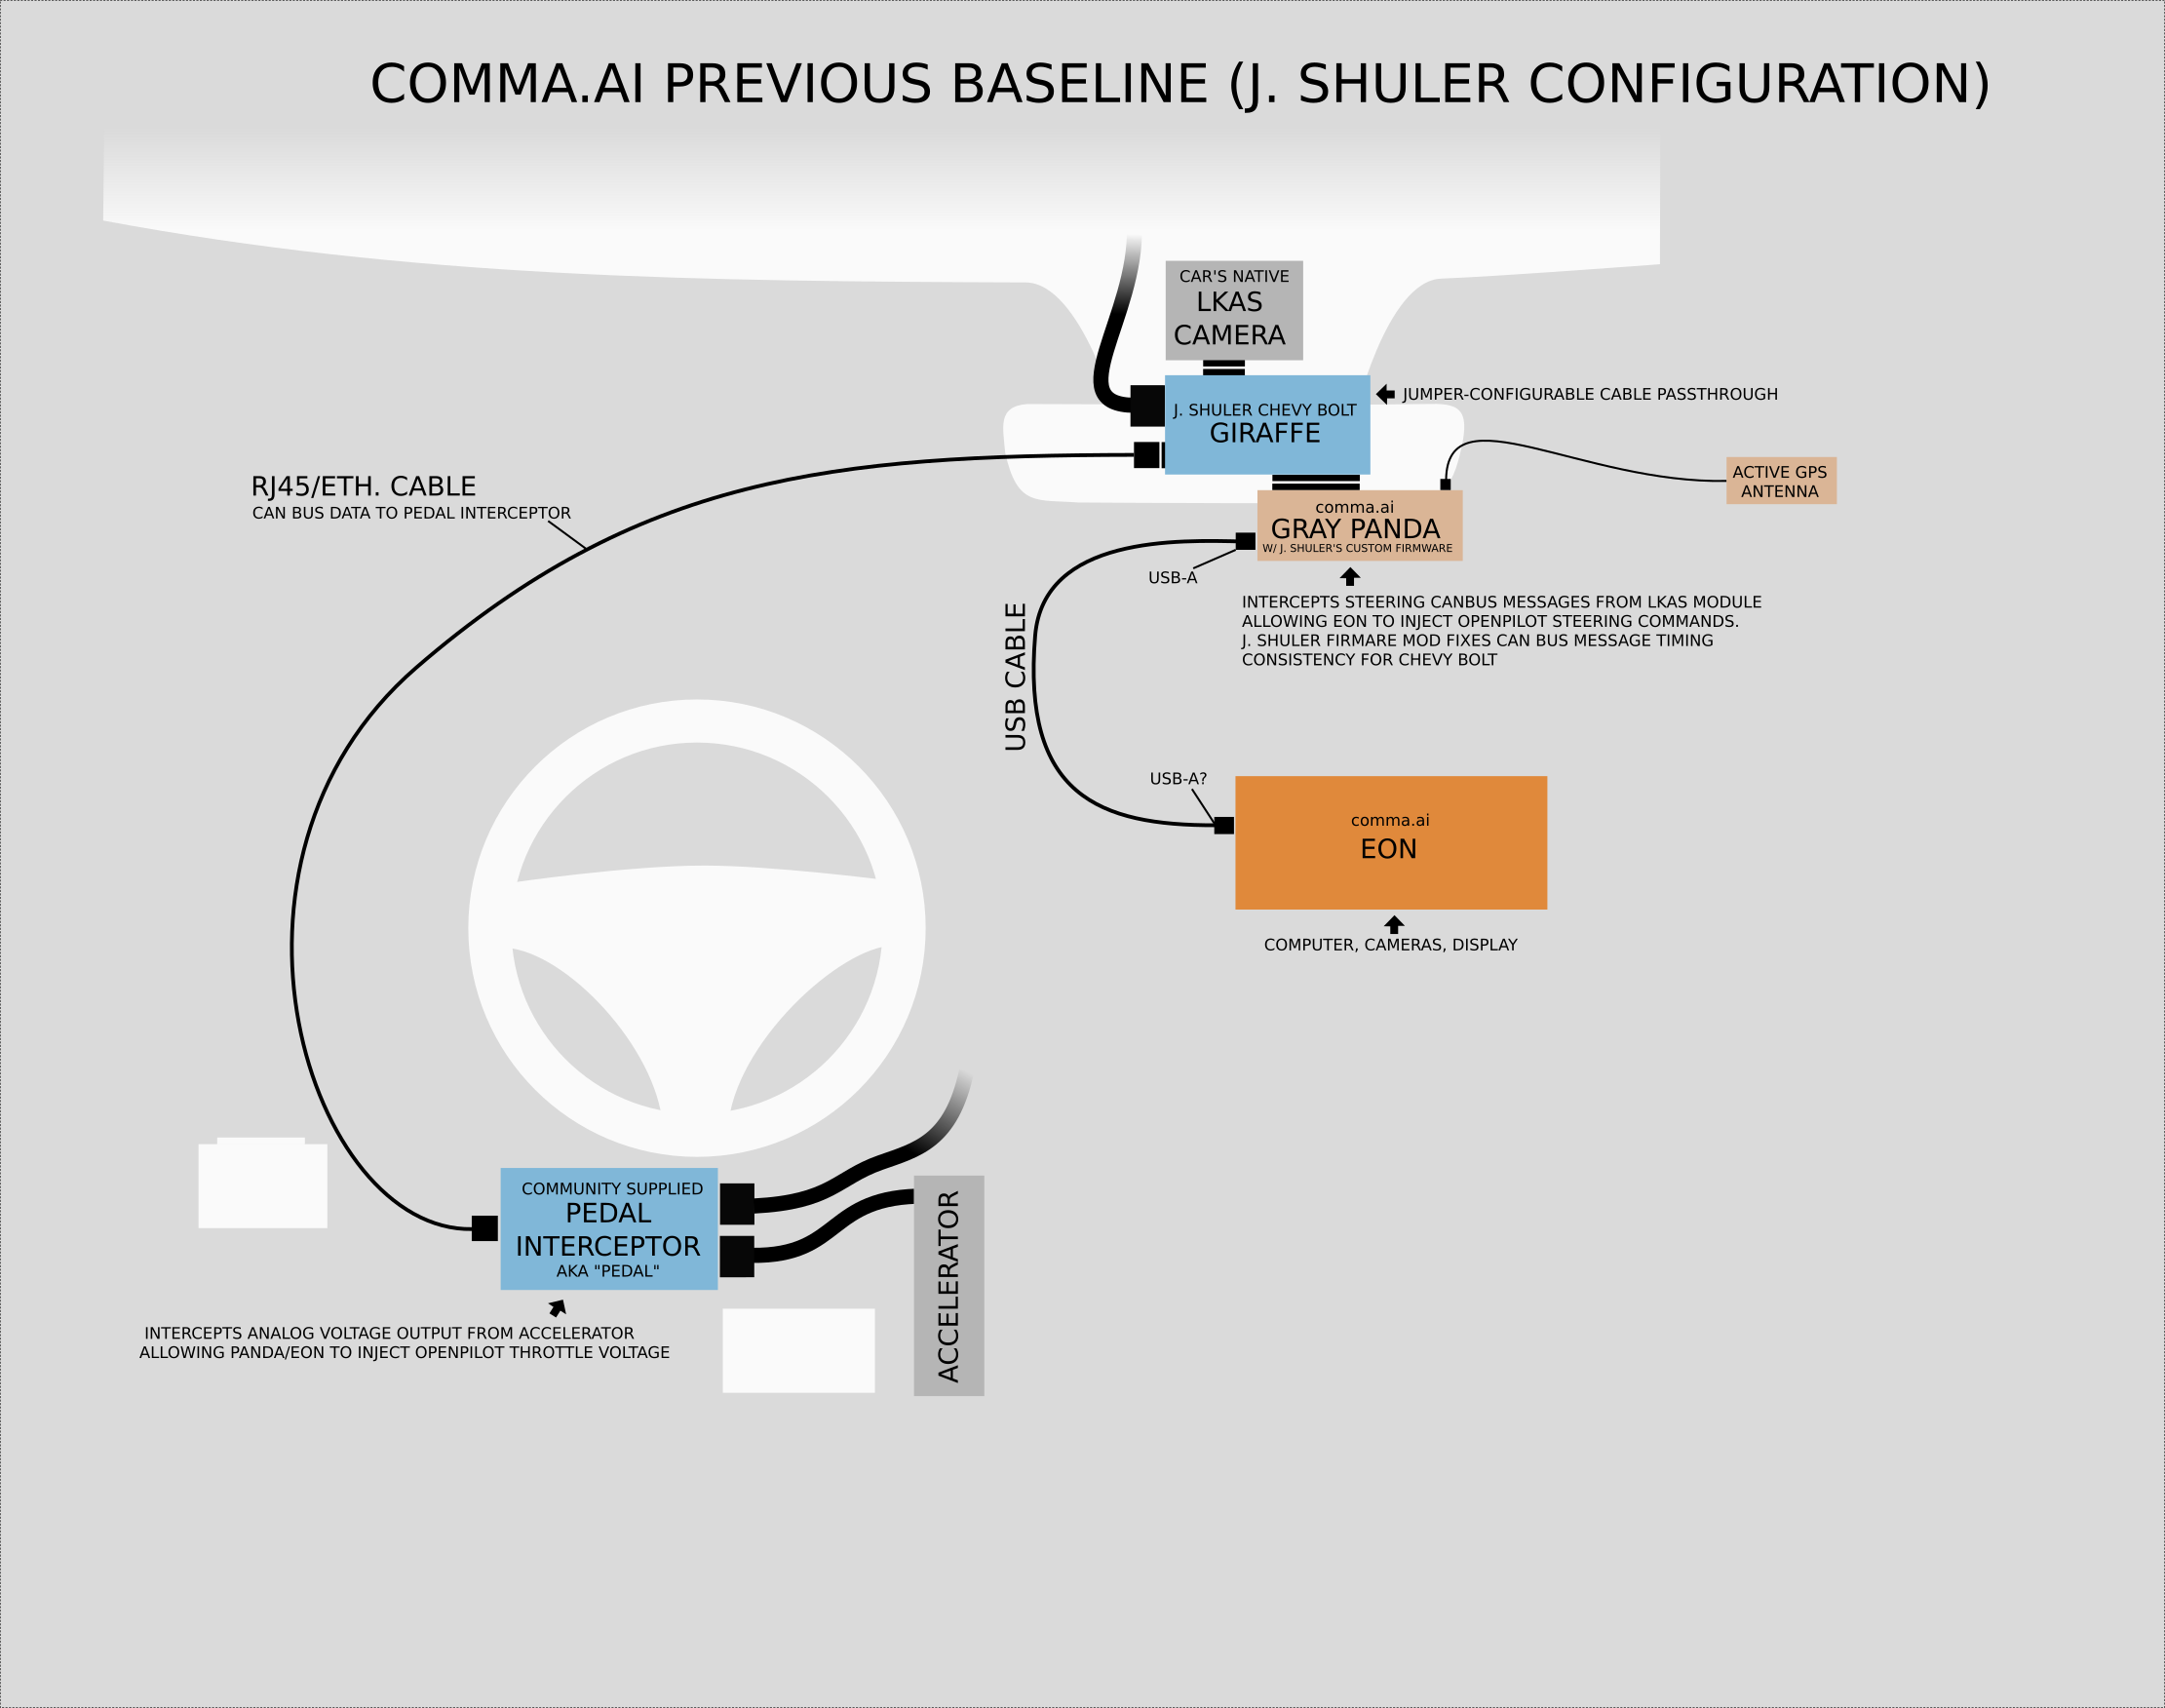
To contribute to the above diagrams, download the .svg file and use Inkscape. The .svg file also includes a bunch of "general case" diagrams for openpilot not specific to the Bolt, but they may contain errors.
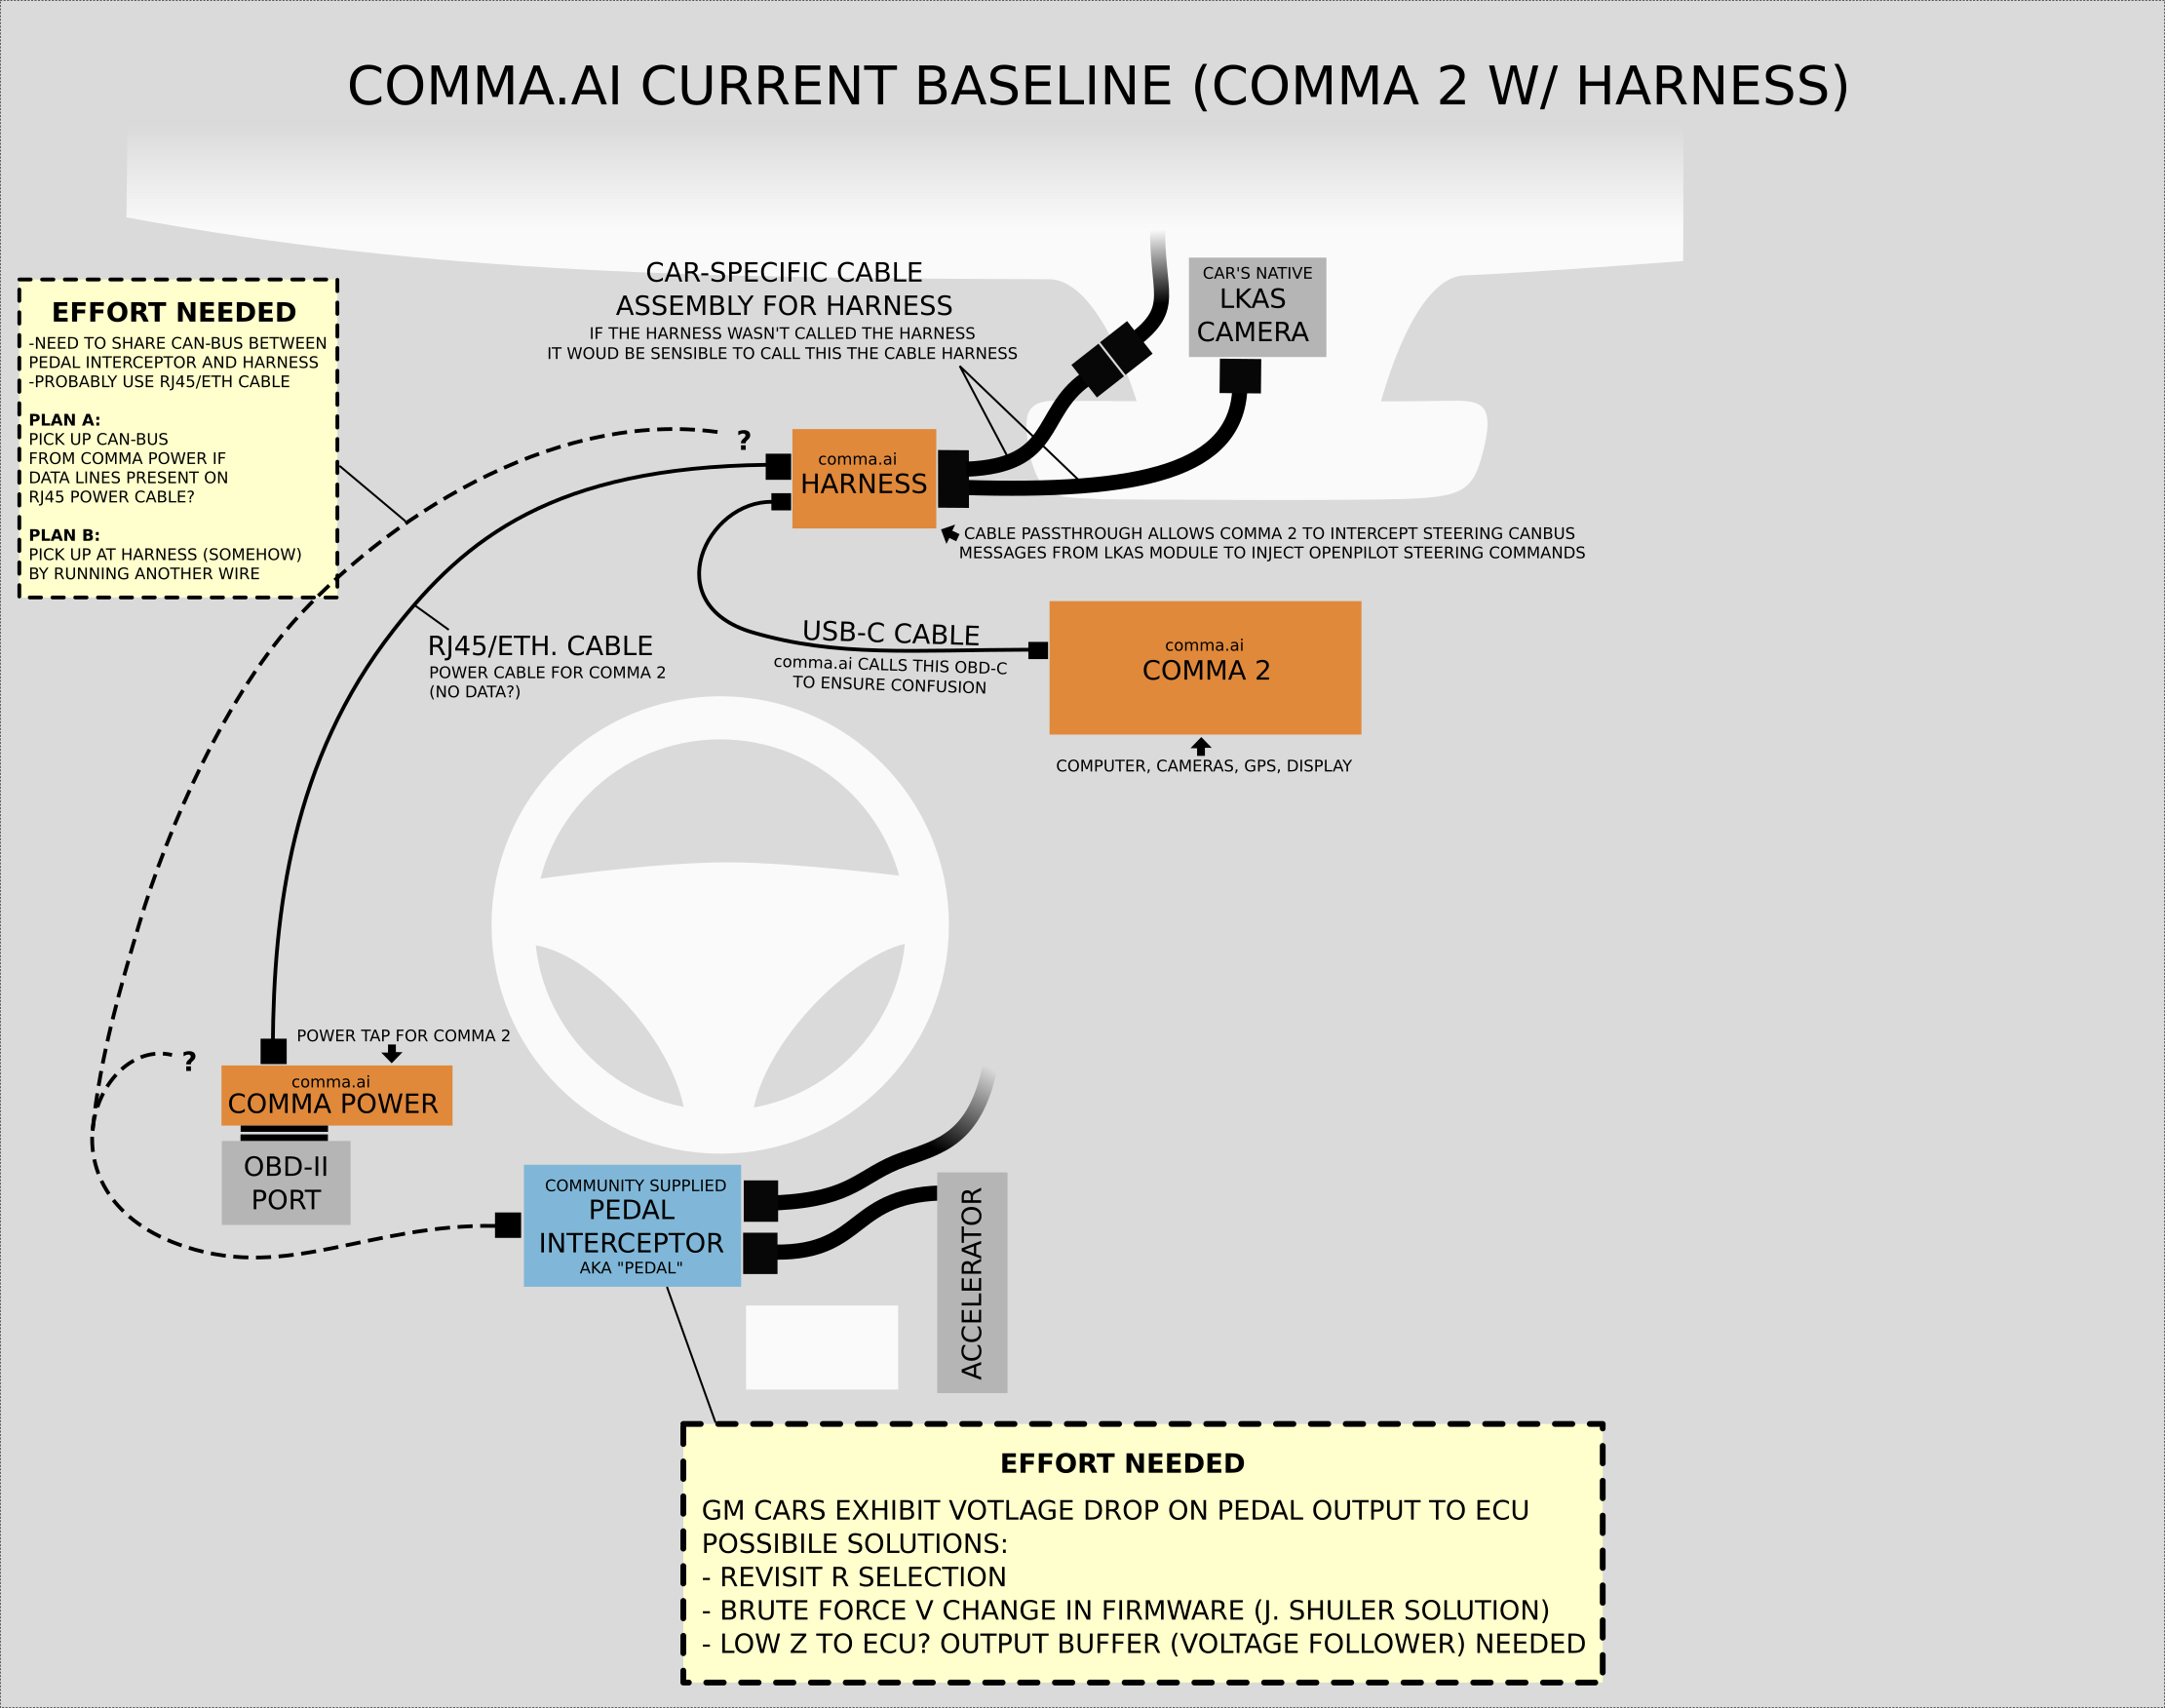
The Comma 2 has an onboard Panda and removes the need for the Giraffe by connecting directly to the car's buses. To do this, you'll need a harness modified to connect properly to the right buses:

To build this yourself you'll need the following parts:
- Male LKAS Connector
- Female LKAS Connector
- At least 12 crimp sockets for the Female Connector
- 22-24 AWG wire. Recommend PVC for abrasion resistance.
- Comma Dev Harness Wires (select Development Vehicle, only need a Black Panda if you have an Eon) or 6 & 7:
- 26-socket Connector
- At least 18 crimp sockets
To assemble, you'll need a crimping tool and a soldering kit. Crimp the sockets onto the wires for the female connectors and insert to the proper slots. Solder the wires to the male connector, wire directly to exterior pins. I shrink-wrapped the solder joints and I plan to reinforce the pins / solder joints with epoxy resin once I'm sure no more solder modifications are needed.
To connect the Comma Pedal we think you can tap into the ethernet run for the Comma Power using an ethernet splitter and extend it to the pedal. (This configuration is untested on the Bolt).
- Gerber files and BOM available here
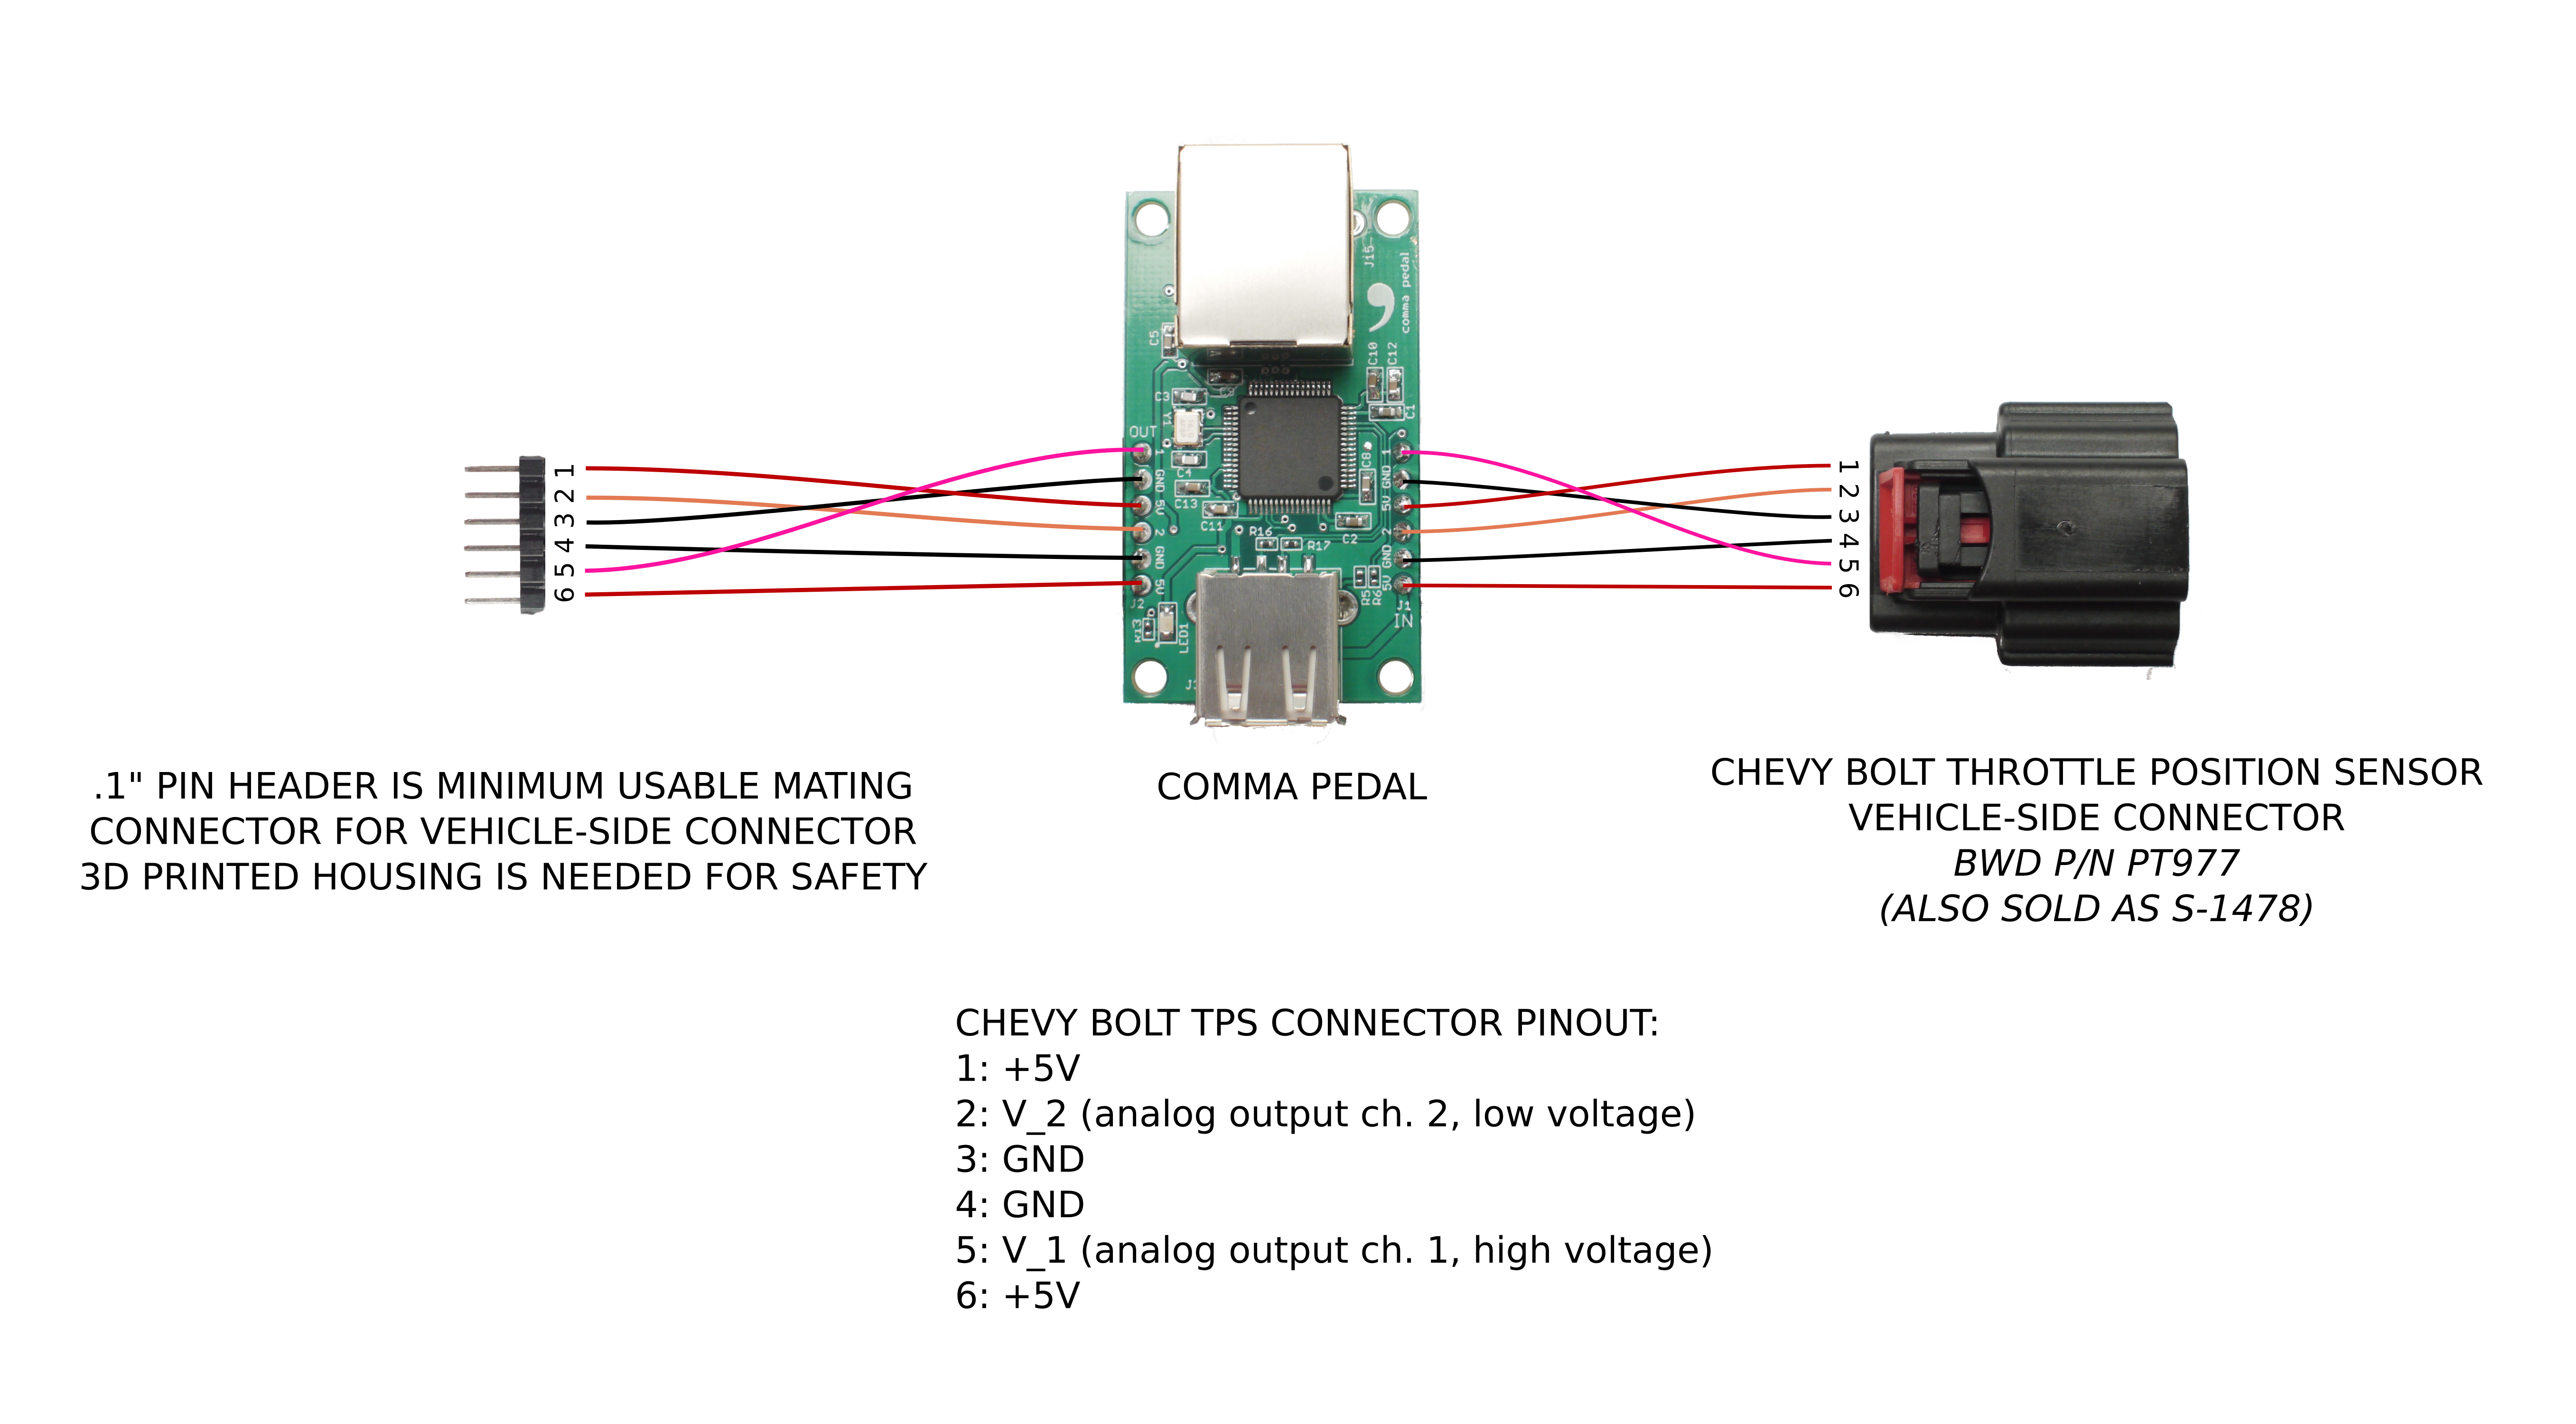
- The vehicle-side TPS connector is BWD P/N PT977 (AKA S-1478)
- J. Shuler's 3D model for printing the mating connector housing for the TPS connector is here. If you don't feel like making an Autocad account, the STL can be downloaded directly here
- The Pedal Interceptor wiki is here
- Instructions for the initial installation of the firmware are here
Wiring the comma.ai Pedal Interceptor for the Chevy Bolt:

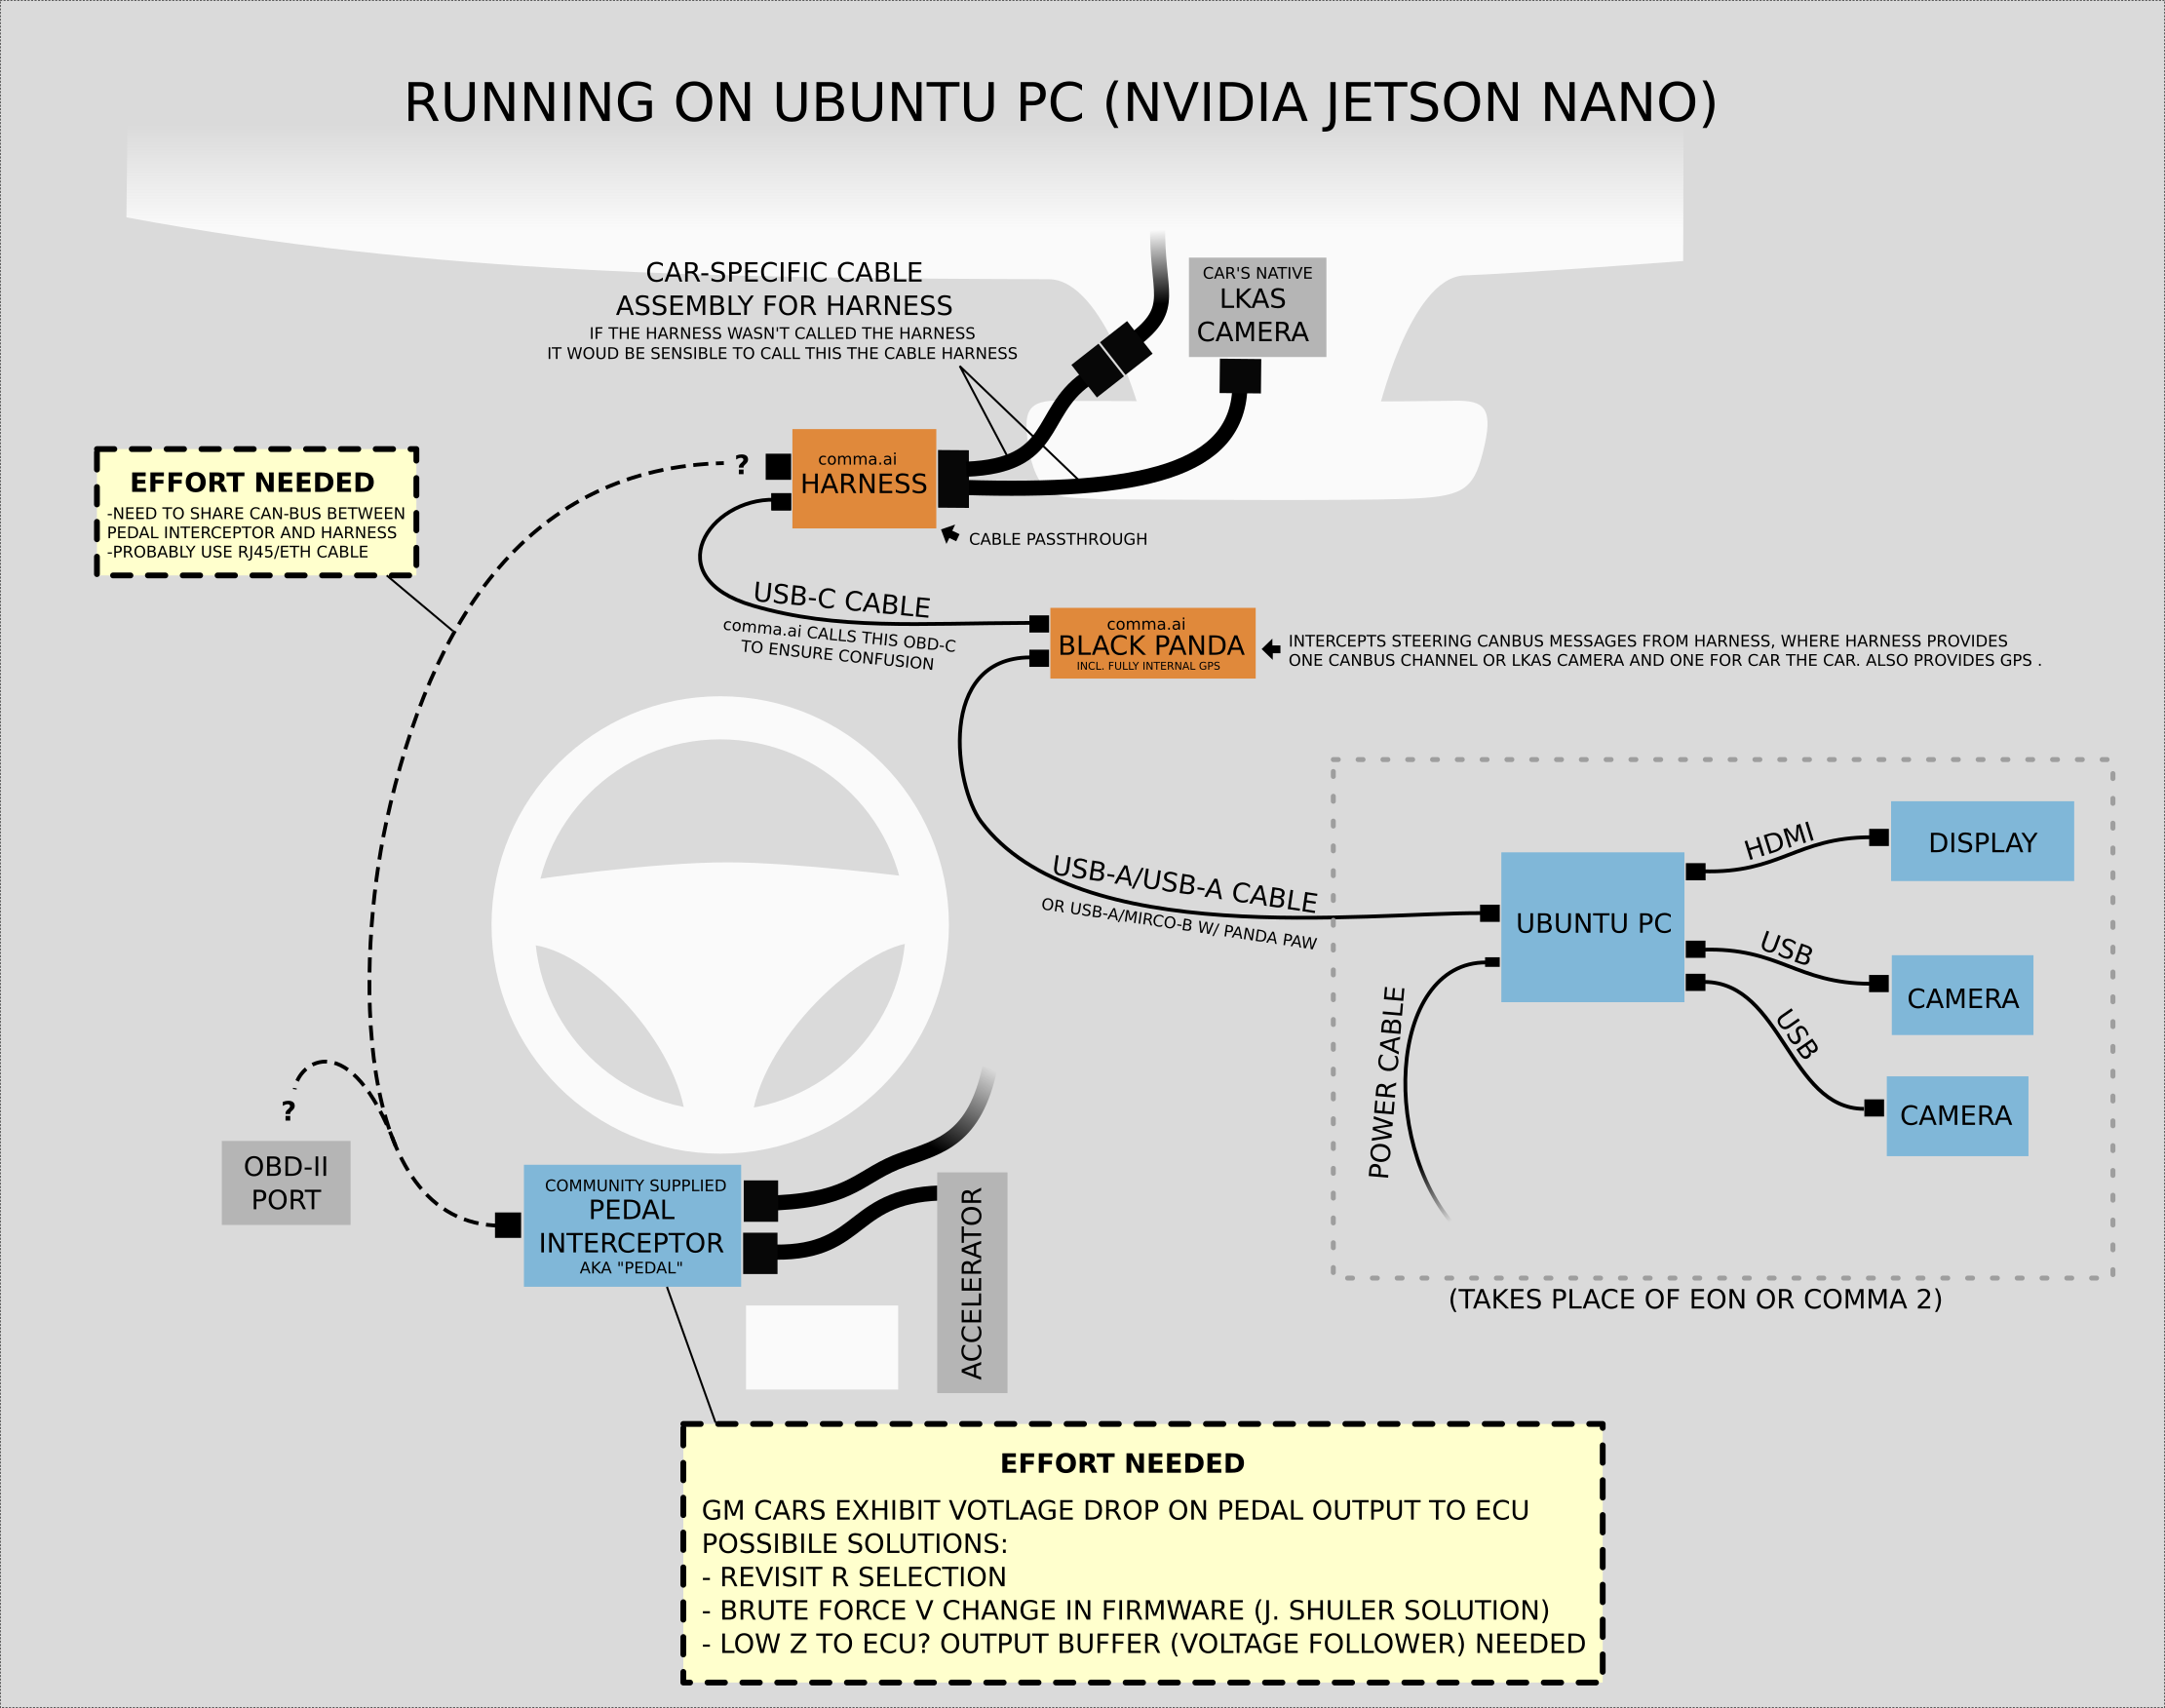
This is an advanced configuration. If you just want reliable L2 autonomy on your Chevy Bolt, use the Comma 2.
- NVIDIA Jetson Nano running JetPack (NVIDIA's default OS based on Ubuntu)
- Case and cooling fan for the Nano
- Power cable (TBD -- Will test first w/ USB power in Bolt. Plan Bs: 12V port or OBD-II)
- 64GB MicroSD Card
- 5.5" OLED HDMI display, namely this one
- Two Logitech C920 HD webcams (or one plus something else). The C920 is hard to get (or discontinued?), so I resorted to eBay.
- USB-A to USB-A cable to connect to Panda, or much more common USB-A to Mini-B along with Panda Paw.
(configuration tested by J. Haupt)
Reference: tools/webcam wiki
- Download the Ubuntu-based OS image (JetPack) from nvidia and flash it to a microSD card
- Boot the Jetson and go through the configuration process. Connect to a network (a Wifi dongle is needed)
- SSH is enabled by default. Can log in remotely at this point.
- In the home directory do
$git clone https://github.com/commaai/openpilot.git - Add the openpilot directory to your python path (add
export PYTHONPATH=$HOME/openpilotto the .bashrc file) and source it (or log out/in) - The next step should be to run ubuntu_setup.sh in ~/openpilot/tools, which just installs all the dependencies needed for openpilot. However, this will fail on the Jetson Nano. Specifically, the pipenv installation tries, but fails, to install the following: h5py, kiwisolver, matplotlib, opencv-python, osmium, pygame, pyproj, scipy, shapely, tensorflow, sympy. The issue is that a few of the dependencies have special installation processes on the Nano, and should be completed before running ubuntu_setup.sh. THE FIX:
- Use mdegan's nano_build_opencv script to install OpenCV on the Nano: Do
$git clone https://github.com/mdegans/nano_build_opencv.git, then cd into nano_build_opencv, and do$./build_opencv.sh.This takes a long time (many hours... 8?) to complete. - Reboot Nano (working headless you wouldn't know, but a message pops up on the display at some point asking for a reboot, yikes!)
- Install TensorFlow by following these instructions. This will install some of the other dependencies required by pipenv, like h5py. NOTE, when issueing the last command in those instructions (the one that actually installs tensorflow with "pip3 install", run with "sudo -H" instead of just sudo.
- Now run ubuntu_setup.sh (in ~/openpilot/tools). Everything should run fine until it gets to line 88 (
pipenv install --dev --system --deploy), at which point will give "An error occured while installing" a few packages, like h5py v2.10.0 and some others. But if you run$pip freezeto display the versions of all installed modules, you should find that some are in fact installed, and the ones that aren't can be manually installed using pip.
- Use mdegan's nano_build_opencv script to install OpenCV on the Nano: Do
work in progress -- (8/7/20 -jh)
Giraffe Info: Gerber files Parts list J. Shuler's design page