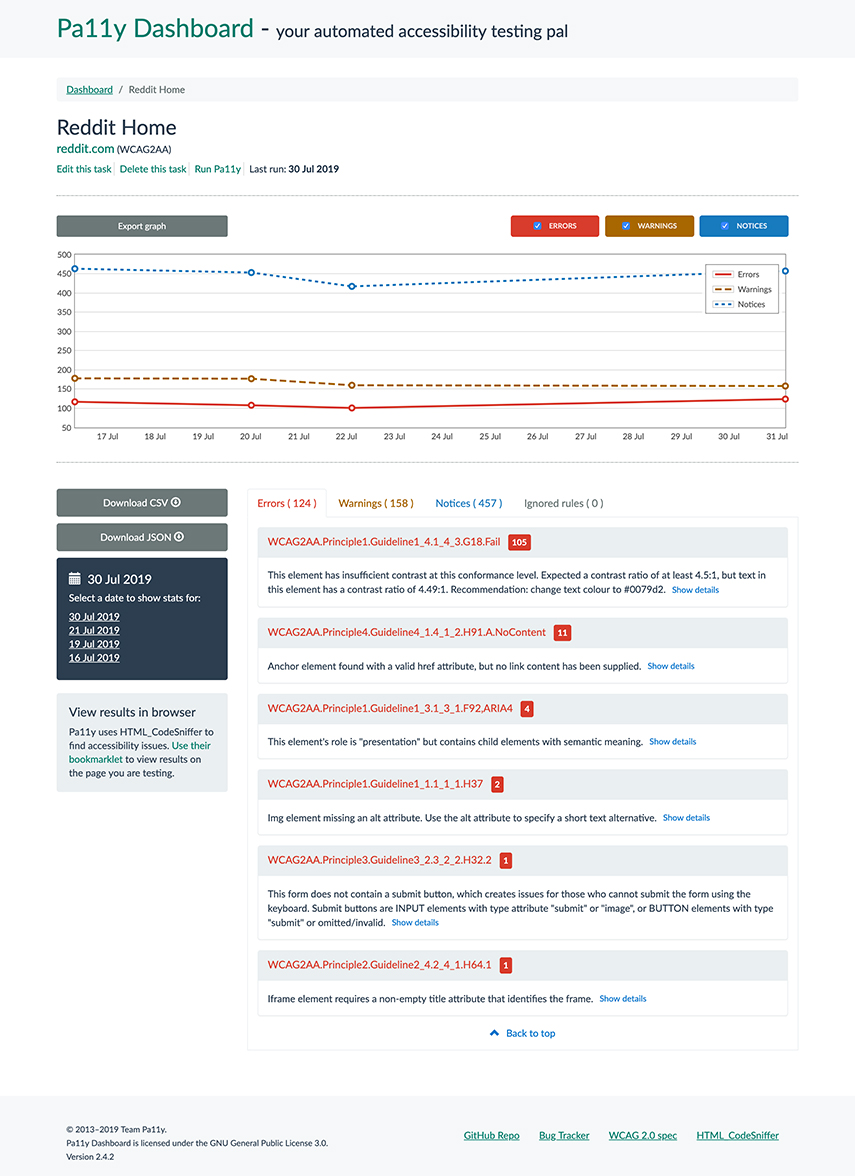
Pa11y Dashboard is a web interface to the Pa11y accessibility reporter, allowing you to focus on fixing issues rather than hunting them down.


![]()

- Node.js: Pa11y Dashboard 5 requires a stable (even-numbered) version of Node.js of 20 or above.
- MongoDB: This project depends on Pa11y Webservice, which stores test results in a MongoDB database and expects one to be available and running.
Pa11y Dashboard uses Puppeteer, which bundles its own Chromium binary. On some Linux distributions (notably Ubuntu 20.04 and above), this bundled binary may fail to launch because required shared libraries are not installed by default.
There are two ways to resolve this:
-
Install the missing system dependencies so that the bundled Chromium works. The list of required packages varies by distribution. Refer to Puppeteer's troubleshooting guide for the current list.
-
Use a system-installed Chromium instead of the bundled one. Install your distribution's Chromium package (e.g.
apt install chromium-browser) and point Pa11y Dashboard to it via theexecutablePathoption inchromeLaunchConfig, or theCHROMIUM_EXECUTABLEenvironment variable (e.g./usr/bin/chromium-browser).
In order to run Pa11y Dashboard, we recommend cloning this repository locally:
git clone https://github.com/pa11y/pa11y-dashboard.gitThen installing the dependencies:
cd pa11y-dashboard
npm installInstructions for installing and running MongoDB are outside the scope of this document. When in doubt, please refer to the MongoDB installation instructions for details of how to install and run MongoDB on your specific operating system. An example of the installation and configuration process for macOS follows.
Pa11y Dashboard uses MongoDB Node.js Driver version 3, which may not support some features of MongoDB versions 6 and beyond. We do however test against MongoDB versions 2 to 7, plus the latest major version, which at the time of writing is 8.
On recent versions of macOS (10.13 or later), you can use Homebrew to install MongoDB Community Edition.
Tap the MongoDB Homebrew Tap:
brew tap mongodb/brewInstall a supported Community version of MongoDB:
brew install mongodb-community@8.0Start the MongoDB server:
brew services start mongodb/brew/mongodb-community@8.0Check that the service has started properly:
$ brew services list

Name              Status  User       Plist
mongodb-community started pa11y /Users/pa11y/Library/LaunchAgents/homebrew.mxcl.mongodb-community.plistThe last step before being able to run Pa11y Dashboard is to define a configuration for it. This can be done in two ways:
Each configuration can be set with an environment variable rather than a config file. For example to run the application on port 8080 you can use the following:
PORT=8080 node index.jsA more complete example using all available environment variables, as you might use in a Docker or cloud deployment:
PORT=8080 \
NOINDEX=true \
READONLY=false \
WEBSERVICE_DATABASE=mongodb://user:password@mongo-host:27017/pa11y \
WEBSERVICE_HOST=0.0.0.0 \
WEBSERVICE_PORT=3000 \
WEBSERVICE_CRON="0 30 0 * * *" \
CHROMIUM_FLAGS="--no-sandbox,--disable-setuid-sandbox" \
node index.js
The available configurations are documented in the next section.
You can store the configuration for Pa11y Dashboard on a JSON file. You can use a different configuration file for each environment you're planning to run Pa11y Dashboard on. You can choose a specific environment to run the application from by setting the NODE_ENV environment variable:
NODE_ENV=development node index.jsThree example files are provided in this repository, you can copy and customise them to your liking:
cp config/development.sample.json config/development.jsoncp config/test.sample.json config/test.jsoncp config/production.sample.json config/production.jsonThe production example uses all the existing configuration options as it would typically be used in a containerised environment:
{
	"port": 8080,
	"noindex": true,
	"readonly": false,
	"webservice": {
		"database": "mongodb://user:password@mongo-host:27017/pa11y",
		"host": "0.0.0.0",
		"port": 3000,
		"cron": "0 30 0 * * *",
		"chromeLaunchConfig": {
			"args": [
				"--no-sandbox",
				"--disable-setuid-sandbox"
			]
		}
	}
}
The available configurations are documented in the next section.
If you run into problems, check the troubleshooting guide.
Pa11y Dashboard uses Puppeteer to launch a Chromium browser for accessibility testing. If you are running Pa11y Dashboard inside a Docker container, a Kubernetes pod, or any similar containerised environment, you will almost certainly need to pass the --no-sandbox and --disable-setuid-sandbox flags to Chromium.
This is necessary because Chromium relies on Linux user namespaces to sandbox its renderer processes. Disabling Chrome's sandbox with --no-sandbox is standard practice in containerised deployments and is safe provided the container runtime's own isolation is in place. The --disable-setuid-sandbox flag disables Chrome's older setuid-based sandbox fallback, which requires a setuid-root helper binary that is typically unavailable (and undesirable) in non-root container images.
Set these flags using the CHROMIUM_FLAGS environment variable or the chromeLaunchConfig.args config file option, as shown in the configuration examples above.
Pa11y Dashboard runs by default an embedded instance of [Pa11y Webservice][pa11y-webservice], which schedules accessibility tests using a cron expression. Each instance of the webservice runs its own independent cron scheduler with no distributed queue.
If you deploy multiple replicas (as is typically the default in most cloud environments) of Pa11y Dashboard with an embedded webservice, every replica will trigger the same scheduled tests independently. This will result in duplicated test runs and duplicated results in the database.
To avoid this, consider one of the following approaches:
- Limit to a single replica. If running the embedded webservice, ensure only one replica is active. This is the simplest option but sacrifices availability.
- Run the webservice separately. Deploy [Pa11y Webservice][pa11y-webservice] as a single-instance service and point the dashboard at it by setting
webserviceto its URL. This way you can scale the dashboard replicas freely without duplicating scheduled tests.
An example Dockerfile is provided at Dockerfile.example to help you get started with containerised deployments. It is a starting point — you are expected to review it and adapt it to your specific infrastructure before use.
The example Dockerfile handles the non-obvious parts of containerising a Puppeteer-based application:
- Multi-stage build to keep the final image small (build tools and git are not included in the runtime image).
- Chromium system dependencies — Puppeteer bundles its own Chromium binary, but that binary depends on shared libraries that are not present in slim base images. The Dockerfile installs all required libraries in both the build and runtime stages.
- Puppeteer cache directory — Puppeteer downloads Chromium to a cache directory during
npm install. By default this goes to~/.cache, which is outside the application directory and would not survive theCOPY --from=buildstep in a multi-stage build. The Dockerfile setsPUPPETEER_CACHE_DIRinside the application directory so the Chromium binary is carried over to the final image. - Non-root user — the application and Chromium run as a non-root user (
pptruser).
The Dockerfile does not include MongoDB. You are expected to provision your database separately (as a managed service, a sidecar container, or however your organisation handles databases) and pass the connection string via the WEBSERVICE_DATABASE environment variable.
Approach 1 — Dockerfile inside the pa11y-dashboard repo:
If you are building directly from a clone of this repository then the default COPY . . instruction in the example Dockerfile will work. The included .dockerignore excludes tests, development tooling, and config files from the build context. Copy the example and build:
cp Dockerfile.example Dockerfile
docker build -t pa11y-dashboard .
Approach 2 — Dockerfile in a separate deployment repo:
If you prefer to keep your deployment configuration (Dockerfile, CI/CD pipeline, manifests) in a separate repository, switch from COPY . . to the commented-out git clone alternative in the Dockerfile. This clones pa11y-dashboard at a pinned version during the build, keeping your deployment repo independent from the application source code. See the comments in Dockerfile.example for instructions.
Running the image:
Pass all configuration via environment variables at runtime. No config files need to be baked into the image. For example:
docker run -p 4000:4000 \
  -e WEBSERVICE_DATABASE="mongodb://user:password@your-mongo-host:27017/pa11y" \
  -e WEBSERVICE_HOST="0.0.0.0" \
  -e WEBSERVICE_CRON="0 30 0 * * *" \
  -e CHROMIUM_FLAGS="--no-sandbox,--disable-setuid-sandbox" \
pa11y-dashboardThe boot configurations for Pa11y Dashboard are as follows. Look at the sample JSON files in the repo for example usage.
(number) The port to run the application on. Set via a config file or the PORT environment variable.
(boolean) If set to true (default), the dashboard will not be indexed by search engines. Set to false to allow indexing. Set via a config file or the NOINDEX environment variable.
(boolean) If set to true, users will not be able to add, delete or run URLs (defaults to false). Set via a config file or the READONLY environment variable.
(string) A message to display prominently on the site home page. Defaults to null.
This can either be an object containing Pa11y Webservice configurations, or a string which is the base URL of a Pa11y Webservice instance you are running separately. If using environment variables, prefix the webservice vars with WEBSERVICE_.
Configuration for the Chromium instance launched by Pa11y. When using a config file, this is an object nested under webservice:
"webservice": {
	"chromeLaunchConfig": {
		"args": ["--no-sandbox", "--disable-setuid-sandbox"],
		"executablePath": "/usr/bin/chromium"
	}
}
When using environment variables, the following options are available:
CHROMIUM_FLAGS: A comma-separated list of flags to pass to Chromium. For example,--no-sandbox,--disable-setuid-sandbox.CHROMIUM_EXECUTABLE: The path to a Chromium executable to use instead of Puppeteer's bundled binary. See Pa11y Dashboard and Linux/Ubuntu for when this is needed.
There are many ways to contribute to Pa11y Dashboard, we cover these in the contributing guide for this repo.
If you're ready to contribute some code, you'll need to clone the repo and get set up as outlined in the setup guide. You'll then need to start the application in test mode with:
NODE_ENV=test node index.jsYou'll now be able to run the following commands:
npm run lint   # Lint the code
npm test       # Run all tests
To compile the client-side JavaScript and CSS, you'll need the following commands. Compiled code is committed to the repository.
make less    # Compile the site CSS from LESS files
make uglify # Compile and uglify the client-side JavaScript500errors orCould not connect to pa11y-webservicemessages are often related to MongoDB. Ensure that you have the appropriate version of MongoDB installed, and that it's running - it doesn't always start automatically.- Error messages saying that pa11y-webservice isn't running may be due to dependency installation problems. Try deleting your
pa11y-dashboard/node_modulesdirectory and runningnpm installagain.
Check the issue tracker for similar issues before creating a new one. If the problem that you're experiencing is not covered by one of the existing issues, you can create a new issue. Please include your node.js and MongoDB version numbers, and your operating system, as well as any information that may be useful in debugging the issue.
Note
We maintain a migration guide to help you migrate between major versions.
When we release a new major version we will continue to support the previous major version for 6 months. This support will be limited to fixes for critical bugs and security issues. If you're opening an issue related to this project, please mention the specific version that the issue affects.
The following table lists the major versions available and, for each previous major version, its end-of-support date, and its final minor version released.
| Major version | Last minor release | Node.js support | Support end date |
|---|---|---|---|
5 |
20, 22, 24 |
✅ Current major version | |
4 |
4.2 |
12, 14, 16, 18, 20 |
May 2026 |
3 |
3.3 |
8, 10 |
May 2022 |
2 |
2.4 |
4, 6 |
January 2020 |
1 |
1.12 |
0.10, 0.12, 4, 6 |
December 2016 |
Pa11y Dashboard is licensed under the GNU General Public License 3.0.
Copyright © 2016-2025, Team Pa11y and contributors