Supported languages: Python and R
Warning
This template is NOT suitable for R or Python package development.
R packages: Bundles of collections of R functions designed to be shared across projects and potentially published on CRAN. Read more about R package development in this book. An accessible guide to developing R packages is available here.
Python packages: Installable bundles of Python code that can be shared across projects and potentially published on PyPI. If you want to develop a Python package, follow the official Python Packaging User Guide or, if you use uv, its packaging documentation.
This repository contains the template of a typical research project within the SoDa organisation. It can be used as a starting point for a new research project.
To use this template for your new project, follow these steps in order:
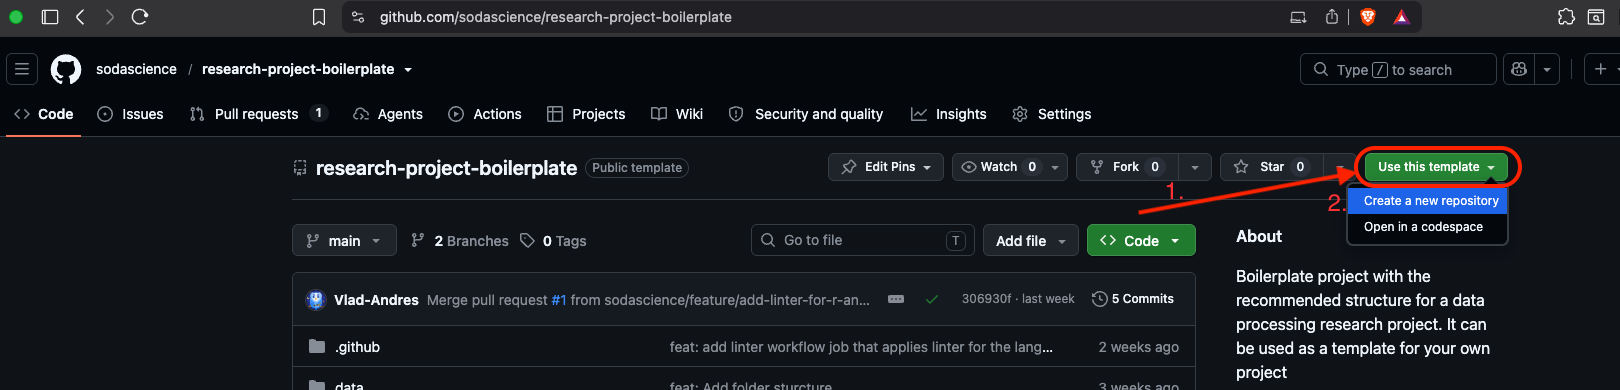
Click the green button at the top of the page labelled as "Use this template" and choose "Create a new repository".
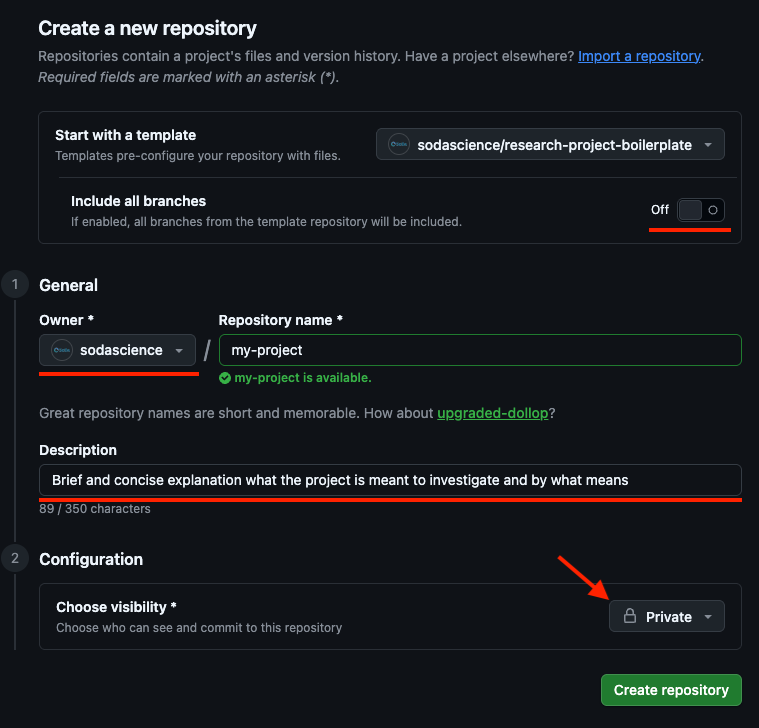
- Keep 'Include all branches' switched off
- Choose "Owner" as "sodascience"
- Choose a name for your new repository
- Add a brief description, it will be displayed in a "About" side-section of your repository.
- Adjust the visibility of your repository (public or private).
Private repositories are visible/accessible only for the owner and other manually assigned contributors. Note: visibility only controls who can see the content of the repository — it does not change our no-sensitive-data-in-git policy, which means that even in a private repo, sensitive data should never be committed to git.
Remove pre-configured .gitkeep files from folders you don't want to be tracked in git, or from folders to which you added some git-tracked files. The .gitkeep files should be there only if some folder you want to be uploaded to github does not contain any tracked files or is empty. Read more about these gitkeep files below.
What is a
.gitkeepfile? Git only tracks files, not empty folders — so an empty folder likedata/raw/would simply disappear when someone else clones the repo. To keep the folder structure visible and intact, we add an empty placeholder file named.gitkeepinside it. So, we used.gitkeepfiles to make sure your new project repo has the same folder structure as this template. Once a folder contains real files, the placeholder no longer serves a purpose, so you can safely delete it. If you don't need a folder at all (e.g.notebooks/if you won't use notebooks), you can delete the whole folder.
The current .github folder contains a simple linter job that checks your code for formatting errors. It runs automatically every time you push changes to your remote repository or open a pull request. It is recommended to keep it as is; if you want to develop project-specific workflows, refer to GitHub's official documentation about workflows.
Once you've completed these steps, you're ready to start working on your project. Scroll down to the README template below and follow the instructions there.
The structure that we created here is common good practice for research projects, and we recommend sticking to it — whether your project uses Python, R, or both. Nevertheless, feel free to extend/change it to your needs. Here is a short description of the folders and files:
├── .github/         # GitHub Actions workflows & configurations
├── data/            # Raw and processed data
│   ├── raw/         # Raw data (read-only)
│   └── processed/   # Data processed by scripts
├── notebooks/       # Exploration & analysis: Jupyter (.ipynb) or R Markdown/Quarto (.Rmd / .qmd)
├── src/             # Main folder for source code (scripts)
├── .gitignore       # Specifies files to ignore in version control
├── LICENSE.txt      # Project license
├── README.md        # Project overview and documentation
└── env.example      # Example environment variables
Dependency management files Files like
pyproject.toml/uv.lockfor Python,renv.lockfor R, and an.Rproj(generated by RStudio) aren't included in this template — add them as needed once you set up your environment.
What are
env.exampleand.envfiles? Projects often need secrets (API keys, passwords, or other sensitive values that must never be published on GitHub, public or private) and machine-specific settings like file paths. The convention is to list these as placeholders inenv.example, which IS committed to the repo. Each contributor then copies it to a new file named.envlocally and fills in their own real values.
Conveniently, we already set up a .gitignore (a file that contains files and directories that should NOT be pushed to remote repositories) for you such that the real .env file will never be pushed to the remote repository. Therefore you can locally create a .env file in the root directory.
Important
Do not delete .gitignore file. If you delete it, the real .env file as well as other files that are supposed to be excluded from GitHub will be pushed.
# Example of .env.example

OPENAI_API_KEY="set_your_openai_api_key_here"
HUGGINGFACE_TOKEN="set_your_huggingface_token_here"
PROJECT_FOLDER_PATH="set_path_to_your_project_folder_here"
RAW_DATA_DIR="set_path_to_local_or_restricted_raw_data_folder_here"
ZENODO_TOKEN="set_your_zenodo_access_token_here"
# Example of .env file

OPENAI_API_KEY="sk-proj-sMEO8Gi82VT5WTy9UiiEpuPtPMRBmgha"
HUGGINGFACE_TOKEN="cunTTJINJzvqMdDbgxzZAa26Z2isZABf"
PROJECT_FOLDER_PATH="/project-name"
RAW_DATA_DIR="data/raw"
ZENODO_TOKEN="BFLvsDh1Qe2lecmzmNu3CjePV310qett"
Note
Please delete everything above this section from the README. Therefore, you will end up with a clean template for your project README file. Make sure to replace all placeholders below (marked as [PROJECT NAME], etc.) with your project-specific information.
The badges below are placeholders — update or remove them to match your project. See shields.io for creating custom badges.



Note
The following table is for explanation purposes, please remove it in your final version of the README.
Project status options (repostatus.org):
| Status | Meaning |
|---|---|
concept |
No real implementation yet — demo/proof-of-concept only |
wip |
In development, no stable/usable release yet |
suspended |
Development paused, but intended to resume |
abandoned |
Stopped for good, no stable release was ever reached |
active |
Stable, usable, and actively maintained |
inactive |
Stable and usable, but no longer actively developed |
unsupported |
Stable, usable, but author(s) have stopped all support |
moved |
Repo relocated — see repostatus.org/#moved for the required alt-text format |
Project Goal and Description - Add a brief description of the project. What is the problem you are trying to solve? What is your proposed solution? What is the impact of your project?
- Add highlights of your project. These can be anything that you think is important to mention.
Here is the initial folder structure of the project established in the template that you used to create your own project. Adjust it to reflect the actual folder structure of your project and describe certain important directories.
├── .github/         # GitHub Actions workflows & configurations
├── data/            # Raw and processed data
│   ├── raw/         # Raw data (read-only)
│   └── processed/   # Data processed by scripts
├── notebooks/       # Exploration & analysis: Jupyter (.ipynb) or R Markdown/Quarto (.Rmd / .qmd)
├── src/             # Main folder for source code (scripts)
├── .gitignore       # Specifies files to ignore in version control
├── LICENSE.txt      # Project license
├── README.md        # Project overview and documentation
└── env.example      # Example environment variables
Add installation instructions here. For example, for a pipeline with multiple stages, you can show the commands that run each stage separately like the following:
Example installation instructions for python:
# Python (uv)
uv sync
uv run python main.py --stage preprocessing
uv run python main.py --stage modelling
Example installation instructions for R:
# R (renv) — run from the terminal
Rscript -e "renv::restore()"
Rscript main.RAdd a brief description of how to use your project.
Provide a citation for your project. We recommend using either the bibtex format or APA, or both. Bibtex is convenient for LaTeX users, while APA is commonly used in many social sciences.
For example:
@software{[project_name],
  author  = {[Author Name]},
  title   = {[Project Name]},
  year    = {[Year]},
  doi     = {10.5281/zenodo.XXXXXXX},
  url     = {https://github.com/sodascience/[PROJECT_NAME]}
}Contributions are welcome! Please see our contribution guidelines for details on branching strategy, commit conventions and recommendations for pull requests process.
Found a bug or have suggestions? Feel free to open an issue in the issue tracker
[PROJECT NAME] is a project by the ODISSEI Social Data Science (SoDa) team. Do you have questions, suggestions, or remarks on the technical implementation? Create an issue in the issue tracker or feel free to contact Contact Person.
